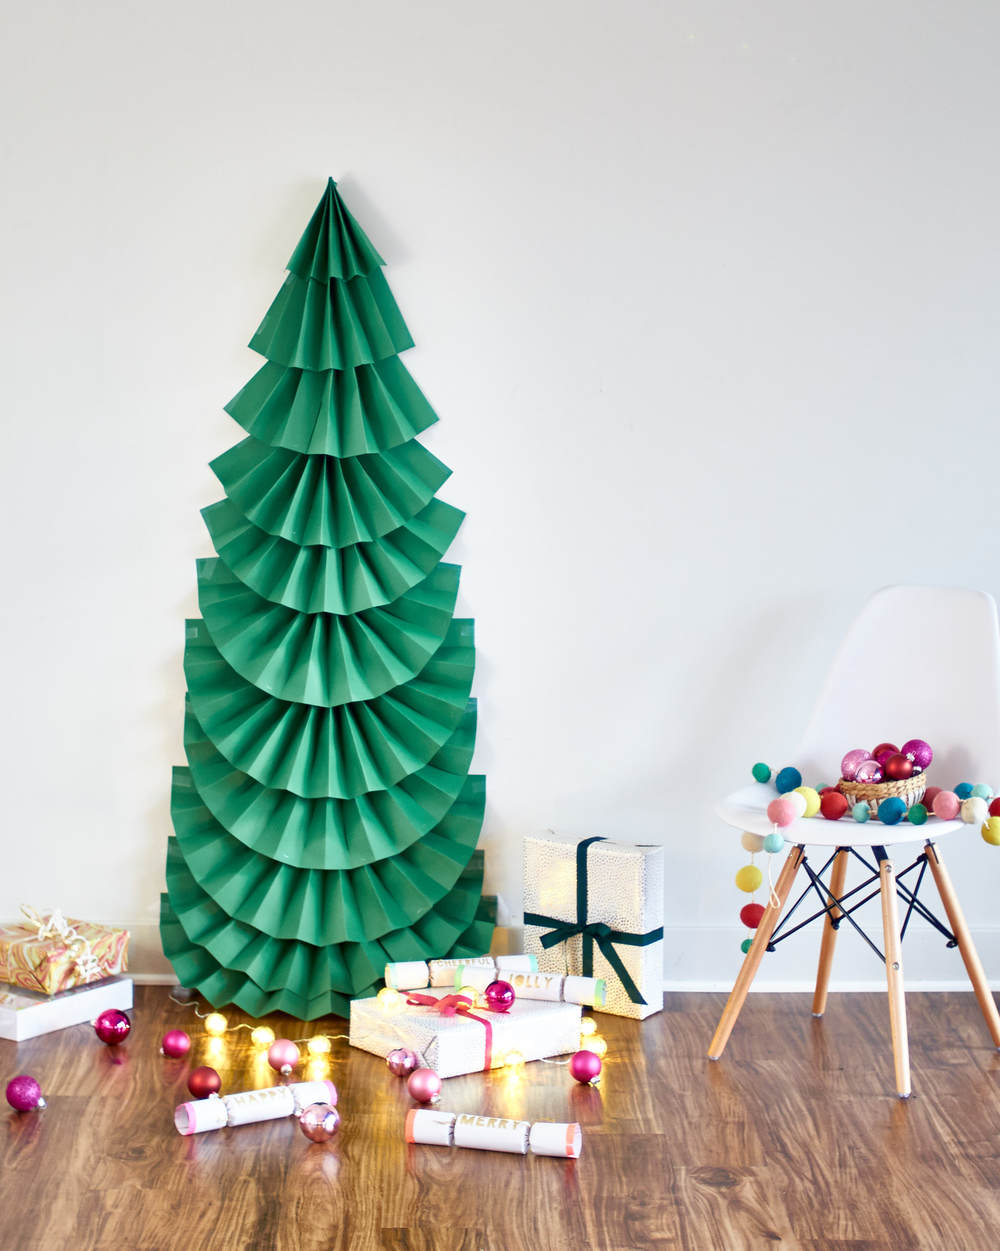
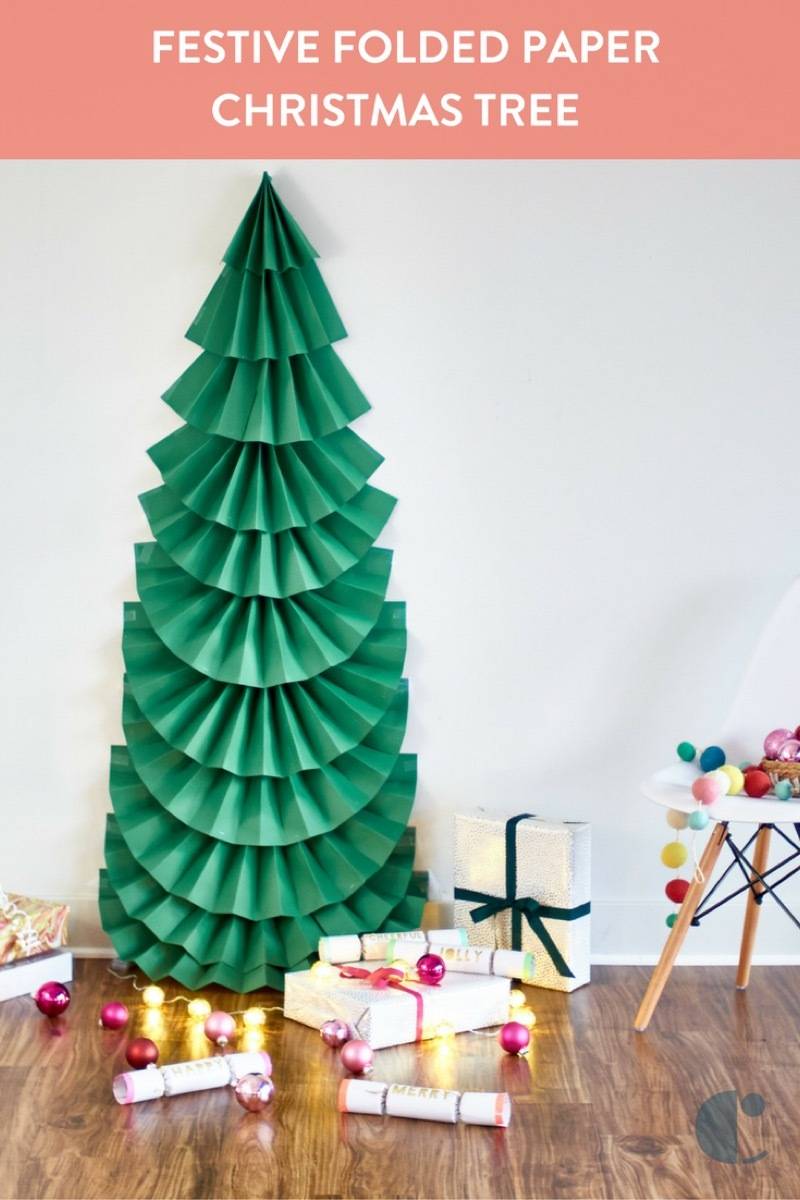
Christmas trees aren’t for everyone. They can be pricey when you’re on a budget, tricky in a small apartment, and nearly impossible with pets.
This year we came up with a super affordable, easy to assemble, clever tree that only requires a wall, a roll of tape, a stapler, dexterous fingers, and about an hour of your time. Right? Right! Let’s make one.
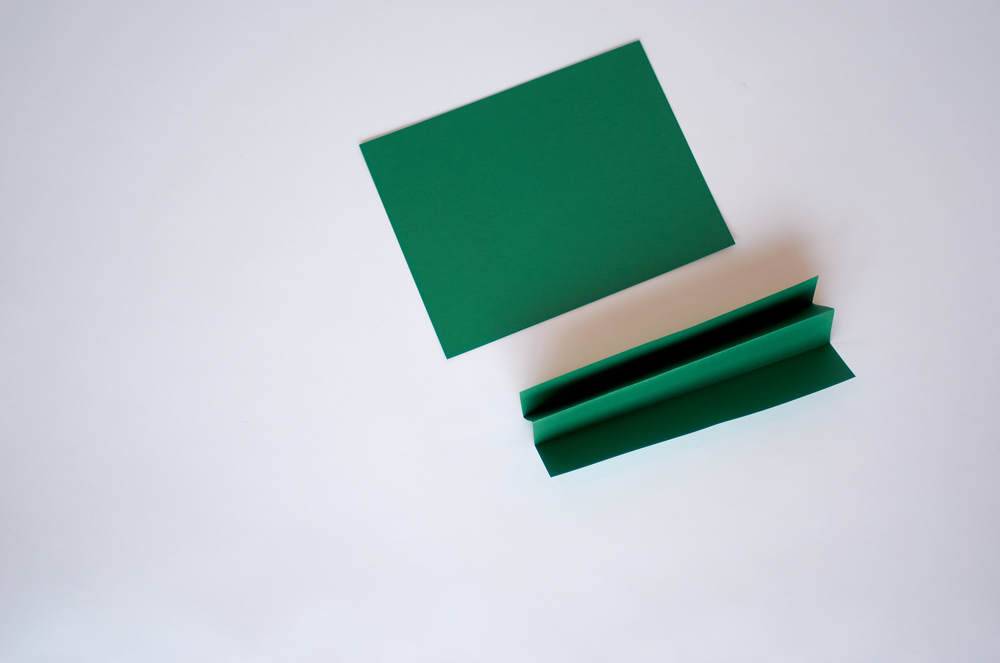
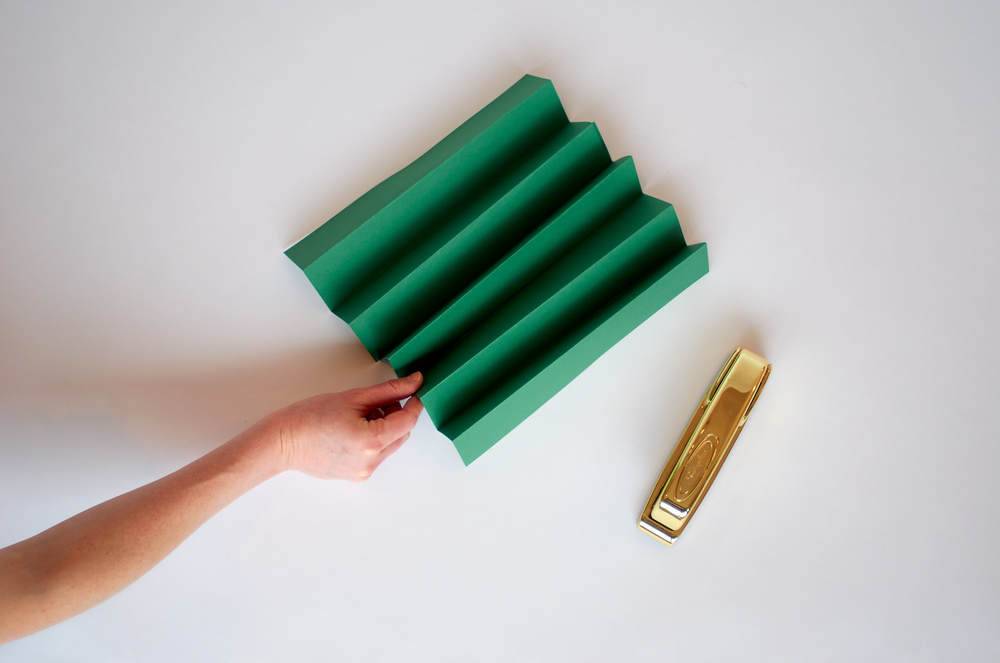
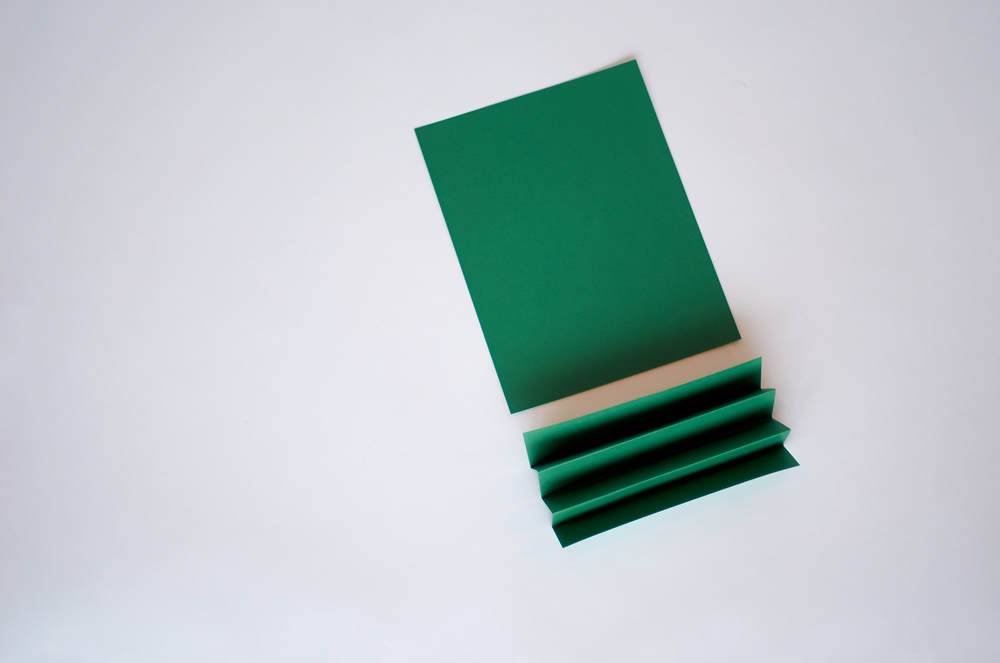
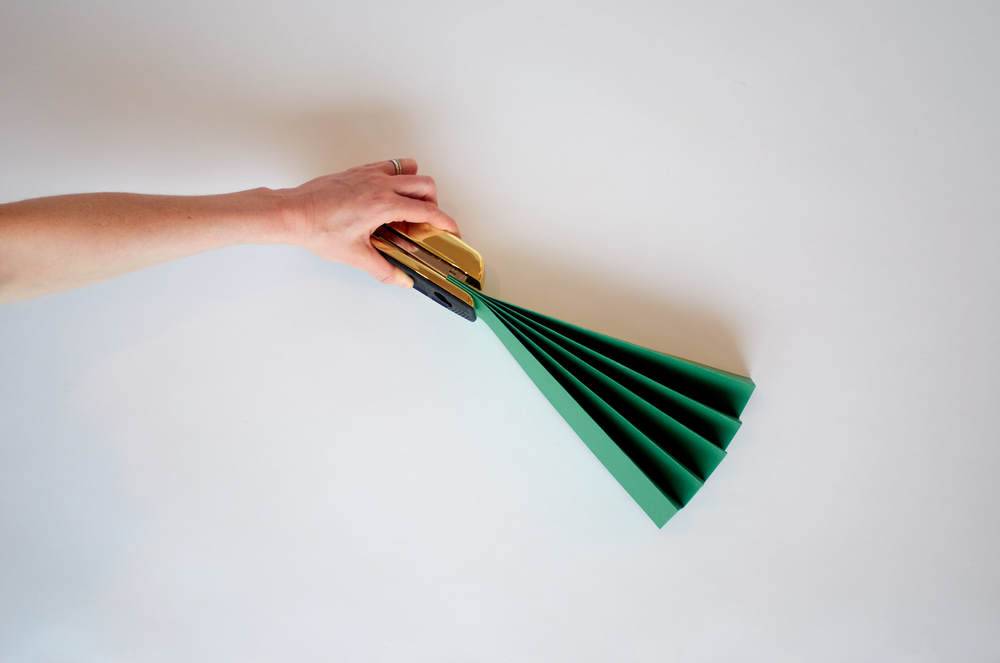
Fold 50 sheets of paper the long way in an accordion pattern. Start by folding the paper in half, lengthwise and then fold the two ends in toward the middle. Your paper will look like the letter “M” (or “W” if you please) while on its side.
Step
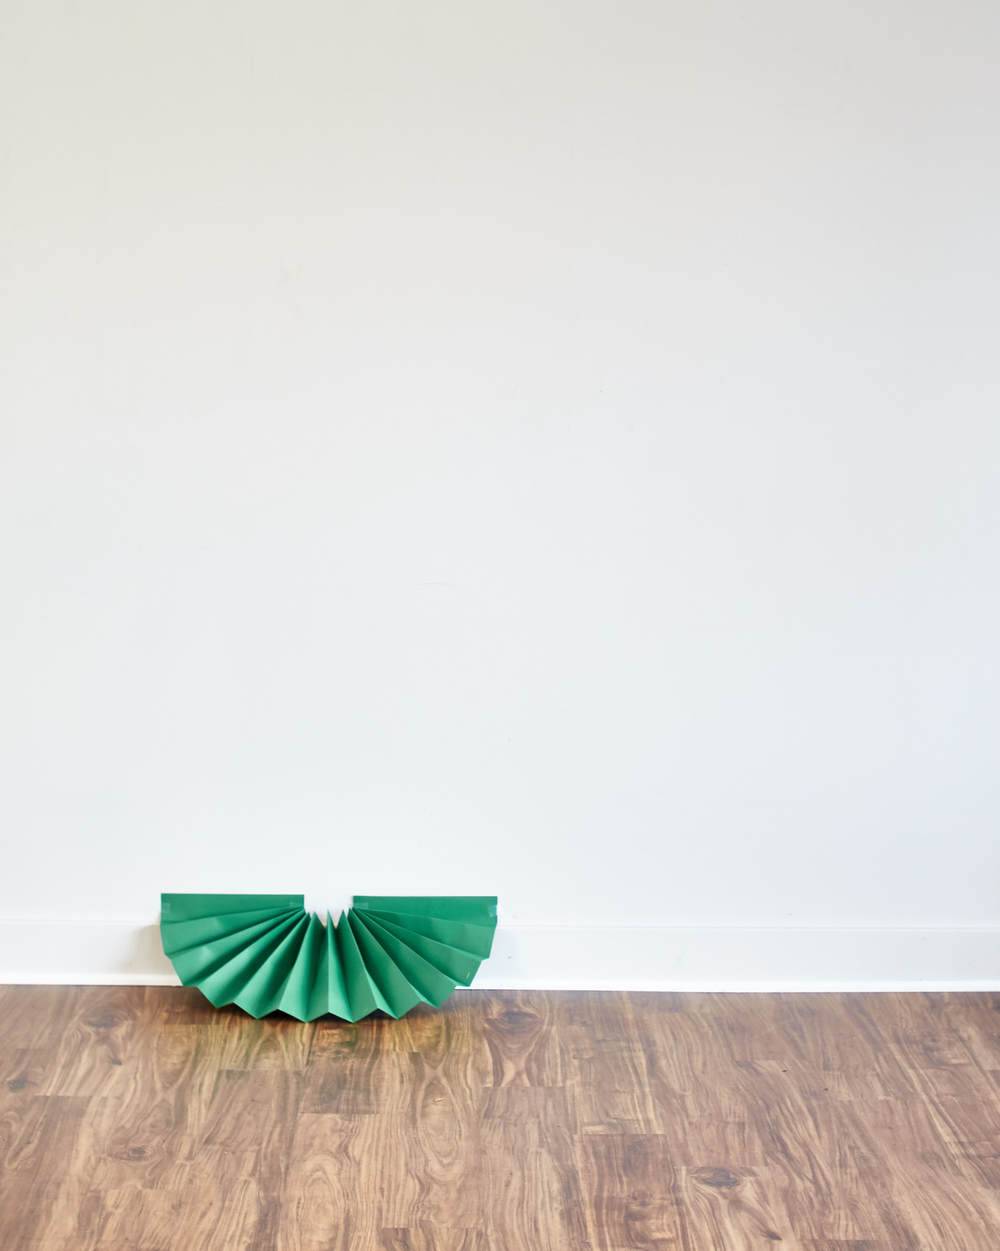
Staple the long ends of the paper together and repeat. You’ll want roughly 6 sets of paper that are 10 sheets, or “M”s long.
Step
Fold another 30-40 sheets of paper widthwise in the same accordion pattern. You’ll want the height of your fold to be roughly the same size as your previous folds. You can eyeball it or use one of your previous folds as a template.
Step
Staple the short ends of paper together and repeat.
Step
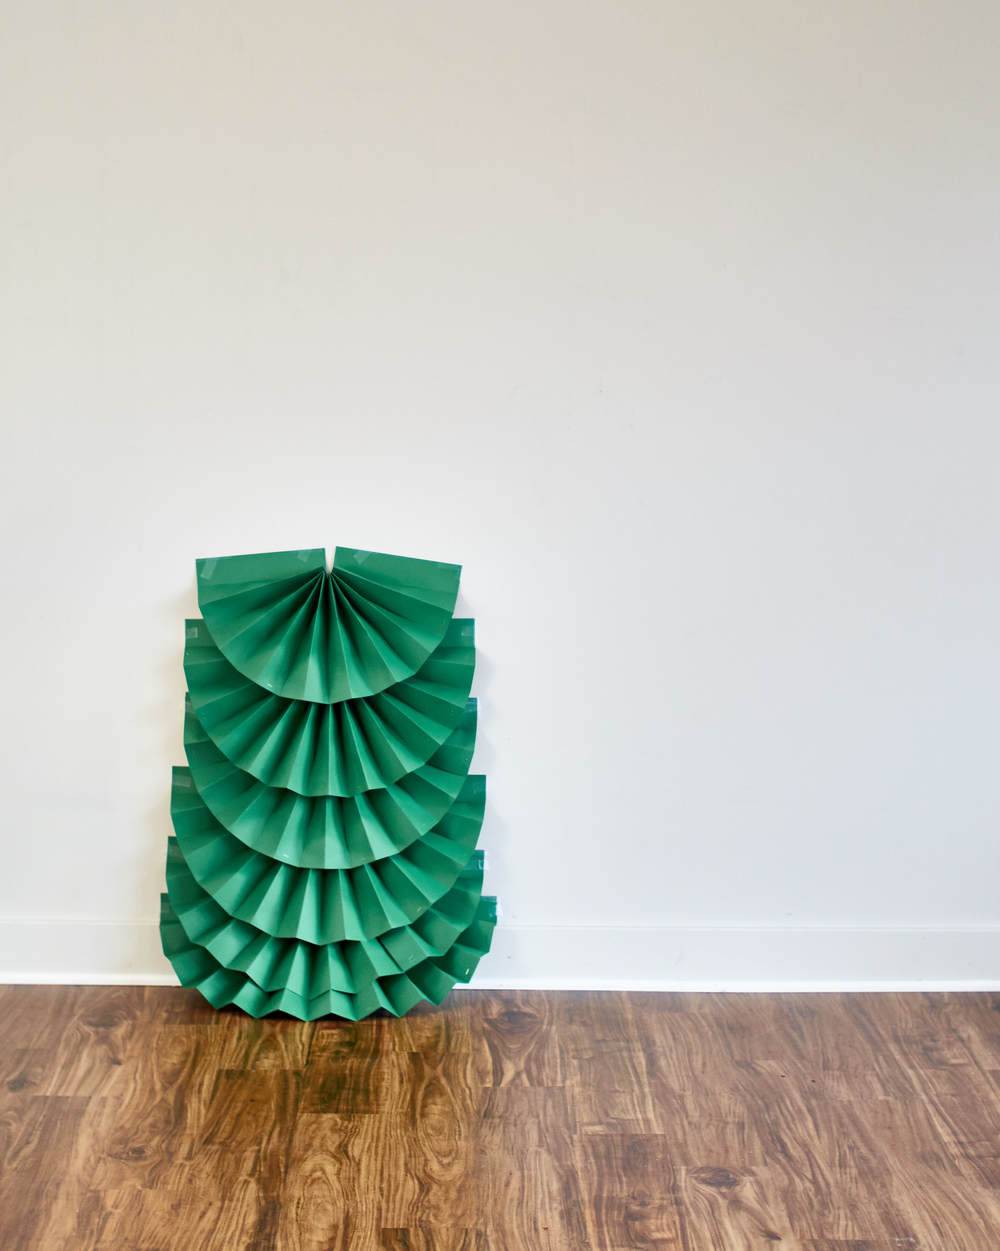
Attach the first set of 10 “M”s to the bottom of the wall with tape. The first layer should be your longest. You can make the subsequent ones shorter as you create a true tapered tree shape. We used Scotch tape for this because I have never had a bad experience with Scotch tape on a painted wall. But, you could easily use removable GlueDots or another adhesive of your choosing. The stapled together “M”s will have a fan-like look and you’ll want to let the drape that occurs with the weight of your paper hang a little bit. It makes it more tree-like as you build up your tree.
Step
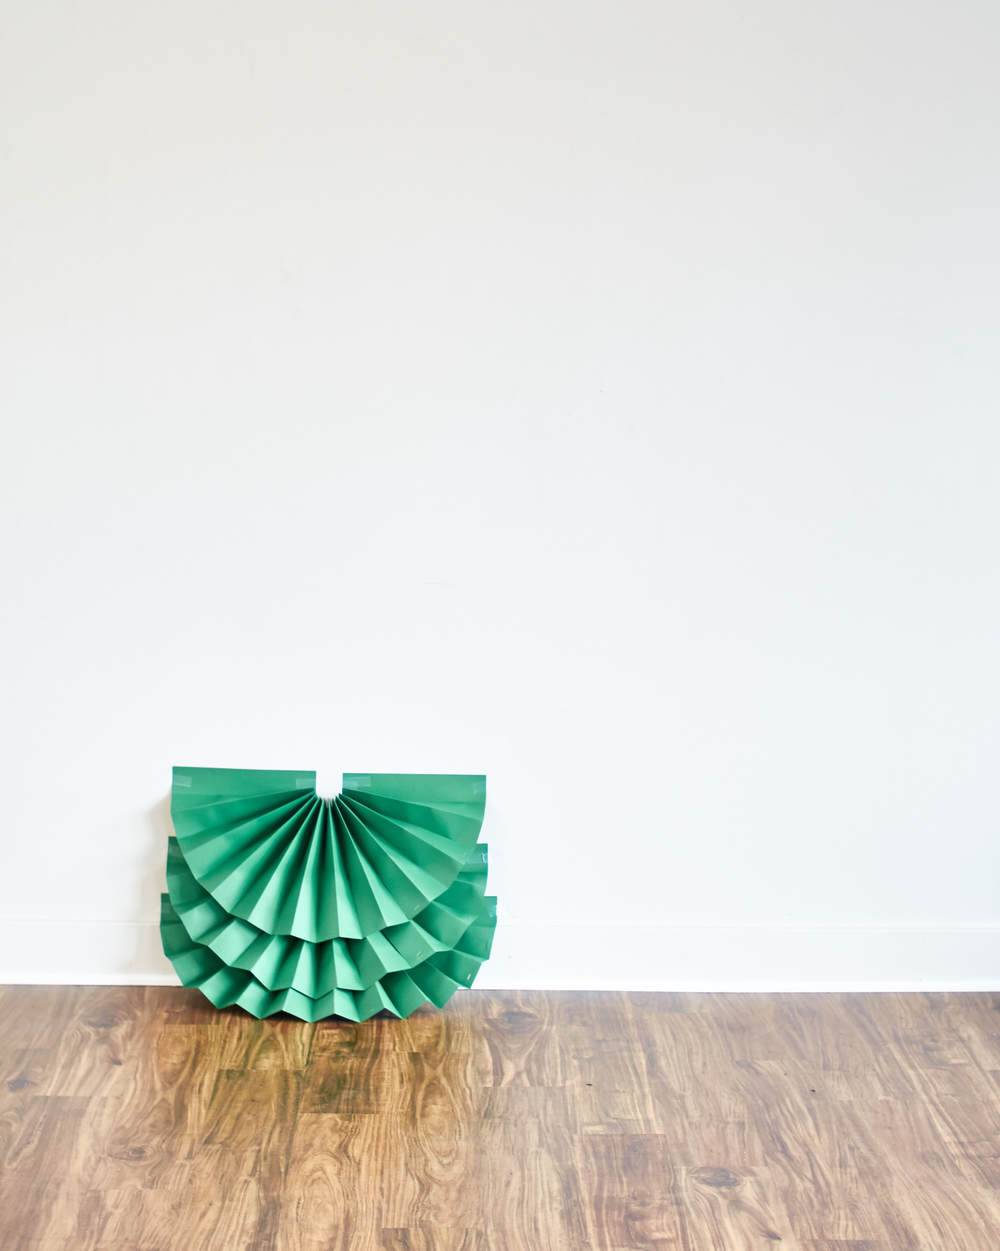
Continue to build your tree, row by row. As you add layers, you may need to begin trimming the ends off of your rows of “M”s. We took about an inch off of 3 sets of the long “M”s and 1-3 inches off of 2 sets of the shorter “M”s. We continued tapering until we reached the top of the tree.
Step
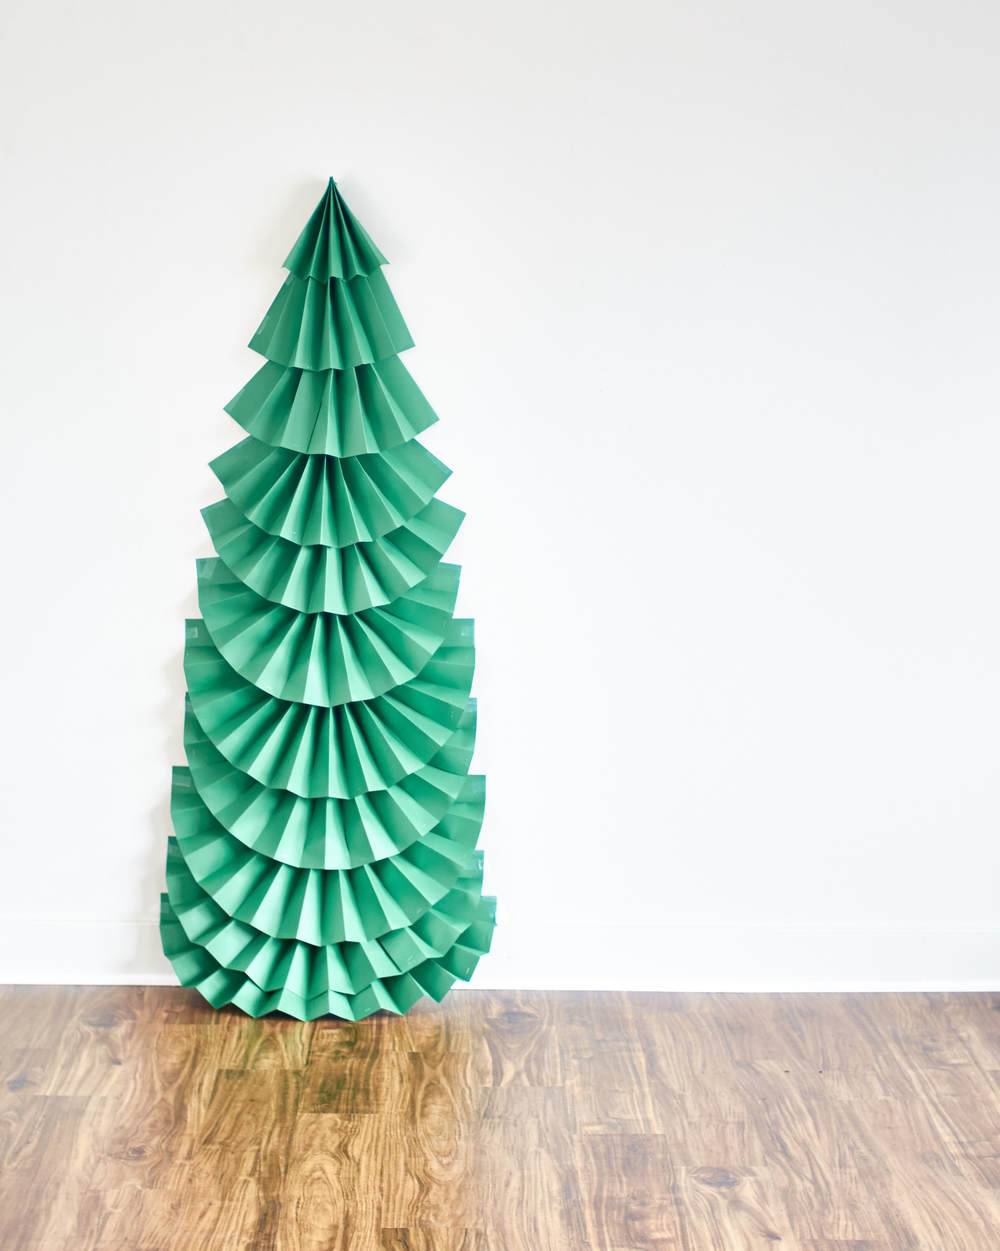
To create your tree’s top, simply accordion fold a sheet of paper, staple the top and fan out the bottom before attaching it to the wall.
And, there you have it, folks! Your own, joyful little wall tree made of paper and your own two hands.
Fabric is a staple in the home and one of the most versatile materials to DIY with. We’ve teamed up with our friends at Fabric.com to head down a fabric rabbit hole – exploring everything from fibers, to trends in patterns and colors, to the easiest projects you can create with fabric.
And for those of you who want to try your hand at a project, we came up with a super simple, stunning DIY wall art idea you can create using your favorite fabric and slats of wood.
Some of Our Favorite Fabrics to Try in Your Home Right Now
Whether you’re considering a very basic toss pillow cover, or thinking about whipping up a new set of drapes for your living room, these are some of our favorite prints, patterns, and fabrics to consider:
Indigo is a color that’s traditionally thought of as being somewhere between blue and purple on the color spectrum, and with a definite mood associated. It’s named after the Indigofera Tinctoria plant from which the dye is derived.
We’re seeing plum colors and blushes coming back in a big way. These pink fabric shades are perfect for clothing (think: dresses, shoes, accessories). Of course, blush colored bridesmaid dresses come to mind quickly, but all sorts of pink clothing ideas make sense.
Bohemian (boho-chich) is trending hard right now, and for good reason. Boho clothing, rugs, home decor and and even jewelry are beautiful and simple to make or find. Would you make a boho wedding dress out of one of these fabrics? Not so sure; but maybe for some brave soul!
Ahhhh … florals. So calm, relaxing, and joyful. Any of these floral print fabrics would make a great wall-hanging (or even wallpaper, if you’re really creative). For that matter, you could take a nice picture of one and use it as a floral background for your phone or desktop.
Black and white is always so simple, stunning, and classic. It’s just really hard to go wrong with a black and white color palette. Black and white curtains are a great way of incorporating some bold pattern in your decor. Or put that pattern on the floor as a rug, or over a couch as a throw!
Fibers are the basic components that make up fabric. There are two classifications of fibers: natural and synthetic (man made and regenerated) fibers. Natural fibers come in a variety of shapes and sizes and are derived from plants and animals.
Synthetic fibers are usually filaments that are extruded and cut to a desired length. Manufactured regenerated fibers are made from the chemical-induced transformation of natural polymers.
In a nutshell, fibers are organized into the following categories:
Natural: Cotton, silk, linen (flax), hemp, leather, wool, and luxury fibers such as alpaca and angora.
Regenerated: Acrylic, Acetate, and Rayon (and more)
Synthetic: Polyester, Spandex, Nylon (and more)
Blends: Poly/Cotton, Spandex/Cotton (blends aim to combine the best characteristics of each fabric, e.g. polyester/cotton blends breathe well and wrinkle less)
When working with fabric in home decor and design, these fabrics are the ones you will most frequently meet:
Cottons: Cotton is abundant, available in different styles, colors, and nearly every print and pattern you can dream up. Cotton fabric is prone to shrinking (remember to account for this when ordering), and should most certainly be washed and dried prior to use. Best Use: light-filtering curtains, quilts, toss pillows
Heavyweight Fabrics – Duck, Canvas, and Denim: These fabrics are much heavier and thicker than basic cotton and are, therefore, substantially more sturdy. Best Use: outdoor projects, toss pillow covers, upholstery
Flannel: Flannel is similar to a basic cotton, but one side is generally soft to the touch. Flannel is prone to pilling though, so take care with washing and caring for it. Best Use: blankets, toss pillow covers
Fabricut Left Bank Flannel
Wool: Wool is a natural fiber with built-in insulation properties. It’s also durable and 100% wool is fire retardant. In home decor, wool blends are ideal because they’re softer and less scratchy than 100% wool.
Best Use: blankets, toss pillow covers, upholstery
Home Decor or Upholstery Fabric: These fabrics come on large rolls and are offered in much wider lengths than other fabrics. They are generally high-quality and will hold up well to home use. Best Use: curtains, rugs, upholstery
Selvage: The thin, self-finished edge of fabric. Selvages are tightly woven to prevent the fabric from unraveling or fraying. Wikipedia
Cross grain: The crosswise grain is perpendicular to the lengthwise grain or selvage edge. The cross grain is also known as the “weft”. Isn’t that Sew
Straight grain: The straight/lengthwise grain of the fabric is parallel to the selvage edge. The straight grain is also known as the “warp”. Isn’t that Sew
Bias: A garment made of woven fabric is said to be “cut on the bias” when the warp and weft threads are at 45° angle to its major seam lines. Wikipedia
Brother CS6000I Sewing Machine: If you’re looking for a great, reliable, basic machine, than look no further. This is the sewing machine we own, and though it has the potential to do fancy things, I use it strictly for straight lines. On lightweight and upholstery-weight fabrics it has held up well for the last 6 years.
Soapstone Fabric Marker:Drawing lines on your fabric is required in nearly every sewing project. These markers are a favorite because they wash out.
First Time Sewing:While I can’t personally vouch for this book, it’s well reviewed on several sewing sites; in fact several people recommend it in lieu of a class.
Singer Complete Photo Guide to Sewing: This book is recommended as a supplement to a sewing class. The photos are helpful for visual learners, but a reasonably solid understanding of the basics is recommended in order for this book to be most beneficial.
5 Fabric & Sewing Blogs to Follow
Purl SOHO: Dozens upon dozens of gorgeous sewing tutorials for your home.
A Fashionable Stitch: Sunni covers everything from clothing to home goods – with a side of wit that will endear her to you.
Madalynne: Maddie Flanigan has a wonderfully detailed ‘Best of 2016’ section that’s not to be missed.
Mood Fabrics: The famous Project Runway fabric shop has a blog full of useful information – like how to sew seams!
DIY Large-Scale Wall Tapestry: Using Fabric as Art
It’s an undisputable fact that framed fabric makes bold, beautiful artwork. It’s affordable and easy to work with, and it can get you the scale you want without bleeding your pocketbook. We created a gorgeous, massive, focal point using a large span of fabric in a vibrant print, hem tape, a staple gun, and sanded and stained wooden slats.. Here’s how you can do the same:
Materials
Fabric – We used 4 yards of upholstery-weight fabric. The fabric was 54 in. wide and we trimmed it to an 80 in. length. Buy it today:
Screen printed on cotton duck; this versatile medium weight fabric is perfect for window treatments (draperies, valances, curtains and swags), accent pillows, duvet covers and upholstery. Colors include orange, citrine, grey, charcoal, plum, teal, green and tan.
2 Wooden Slats – 1 in. by 3 in., cut to 56 in. length (Pro tip: Most home improvement stores will cut lumber for you if you don’t have a saw yourself)
Using a piece of sand paper, sand away any rough edges from the wooden slats.
Step
In a well-ventilated area, apply wood stain to all sides of the wood slats. Let dry completely.
Step
While the wood stain is drying, lay the fabric right-side down on a large surface that can be ironed on (i.e. carpeting, a large blanket, or towels). Set the iron to a medium, dry heat. Lay out the iron-on hem tape about 1/2 inch from the selvedge edge of the fabric. Use the iron to adhere the tape. It takes 2-3 seconds of pressure for the hem tape to stick. Once the hem tape has cooled, remove the paper backing.
Step
Fold the selvedge edge down 1/2 inch, and iron the fold down on the tape. It will take 5-7 seconds for the hem tape to adhere to the back of the fold. Repeat steps 3 and 4 for the opposite side of the fabric, creating two hems down the sides of the tapestry.
Step
Once the stained wood has completely dried, screw in two eye hooks to the top of one of the wood slats.
Step
Lay one of the non-hemmed edges of the fabric across the back of one of the wooden slats. Fold down the raw edge of the fabric, and staple in place across the back of the wooden slat. Repeat the process for the opposite end of the fabric on the second wooden slat.
Step
Tie a piece of twine to the eye hooks to hang. Done!
Even if Valentine’s Day isn’t your thing, flowers should be. And if Valentine’s Day is your thing (it’s definitely mine), then you’re going to love this DIY project. We put together a simple way to present your blossoms to your boo, your bestie, or your bae. And, we’ve added a few free! printable! adornments you can add to your bouquet. Read on to find out how.
Materials
Flowers – Pick your favorites! We chose tulips, spray roses, and ranunculus
Brown kraft paper or paint masking paper– It’s classic and versatile and stunning with ribbon (are you humming the line, Brown paper packages, tied up with string. These are a few of my favorite things…? I am!)
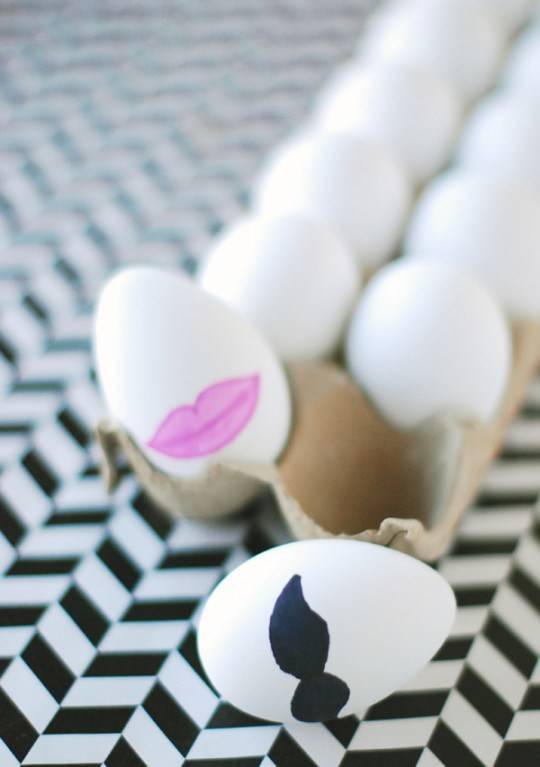
Optional: If you want to dress up your kraft paper, grab some paints and a brush and paint the town (brown?) red. We did quick Xs and Os, lips, and hearts.
Add a few simple designs to your brown kraft paper. I did Xs & Os, lips, hearts, and arrows using acrylic craft paint.
Step
Trip your kraft paper to size. You’ll only need about a foot for a small bouquet like the ones I made.
Step
Line your kraft paper with mylar and wrap your bunch. Don’t worry about making it look perfect. A simple wrap that’s tighter at the bottom and more open at the top looks great.
Step
Add a ribbon to the outside of your wrapped bouquet.
We’re fully on board with Galentine’s Day and we whipped up a sweet and simple DIY project you can complete in a matter of hours. Start brainstorming nicknames for your dynamic duo, your terrific trio, and your fantastic foursome, because once you start this project, you won’t want to stop.
Inspired by these tees, I put together a set of hand painted mugs to treat my best friend.
Alphabet Stickers – You’ll want a full sticker sheet (not just stickered letters; you’ll want to use the letter’s outline as a stencil)
Scrap of Fabric
Step
Wash and thoroughly dry your mugs.
Step
Cut around the outline of each letter and remove the actual letter so you’re left with a stenciled outline. To prevent the stencil from permanently sticking to your mug, press it against a clean scrap of fabric to make it less tacky.
Step
Place the stenciled letters on your mug in a straight line. You can use a strip of washi tape to keep your line straight.
Step
Brainstorm a list of nicknames to put on your mug. Here are some of our favorites:
Bacon + Eggs
Thelma + Louise
Pen + Paper
Donut + Coffee
Bread + Butter
Beyonce + Kelly + Michelle
Monica + Rachel + Phoebe
North + South + East + West
Apply the stencil stickers to your mug.
Step
Fill a round foam brush (spouncer) with paint and dab it on your stenciled letters.
Step
While your paint is still wet, carefully remove the stickers from your mug and do any touch-ups with a Q-tip.
Step
Bake the mugs at 350 degrees Fahrenheit for 30 minutes. Once baked, let the mugs cool in the oven. Some people report that this paint is dishwasher-safe, but hand washing is what the manufacturer recommends.
A note about safety. Although this enamel is specifically designed for ceramic and glassware, the manufacturer recommends your mouth not come into contact with the enamel. We recommend the same.
That’s it! Doesn’t the simplicity of this project and the satisfaction you feel make you want to repeat steps 1-6 at least a dozen more times?
One of my favorite things about interior design and home improvement is discovering tools that help us do our job better. Painting is one of those jobs. We paint things all the time – walls, furniture, floors, floor tiles, baskets. Why? Because nothing transforms a space (or an object) quite like paint does.
But painting can also be a chore. It’s time consuming, messy, and unforgiving. And it requires careful prep work. A few months ago, Bruno and I took part in a painting event at Wagner Spray Tech. Wagner specializes in paint sprayers that are total game changers. We had always been hesitant to use a paint sprayer indoors, but the folks at Wagner took us into their painting ‘lab’ and taught us some tricks, and I painted two large walls in less than 10 minutes. Then I looked at Bruno and said, “I’m never rolling a wall again.” And I meant it.
Not only did the indoor paint sprayer make the process go speedy-fast, but the paint coverage was flawless. No streaks, no thin areas that needed another coat, and no thick, drippy areas that needed to be retouched. It was the most satisfying painting experience of my life.
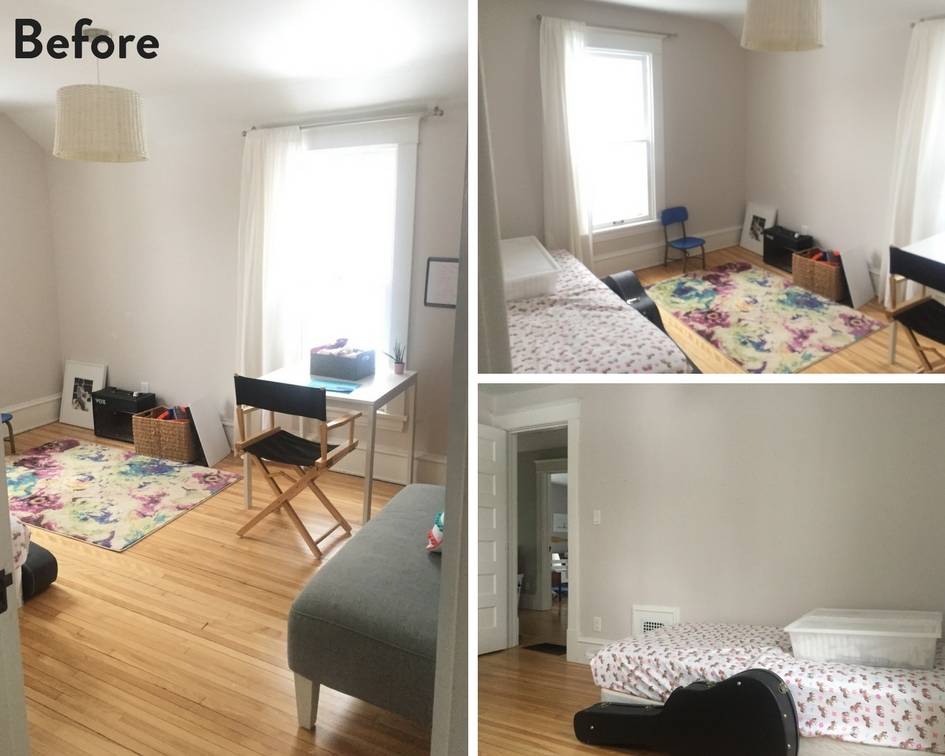
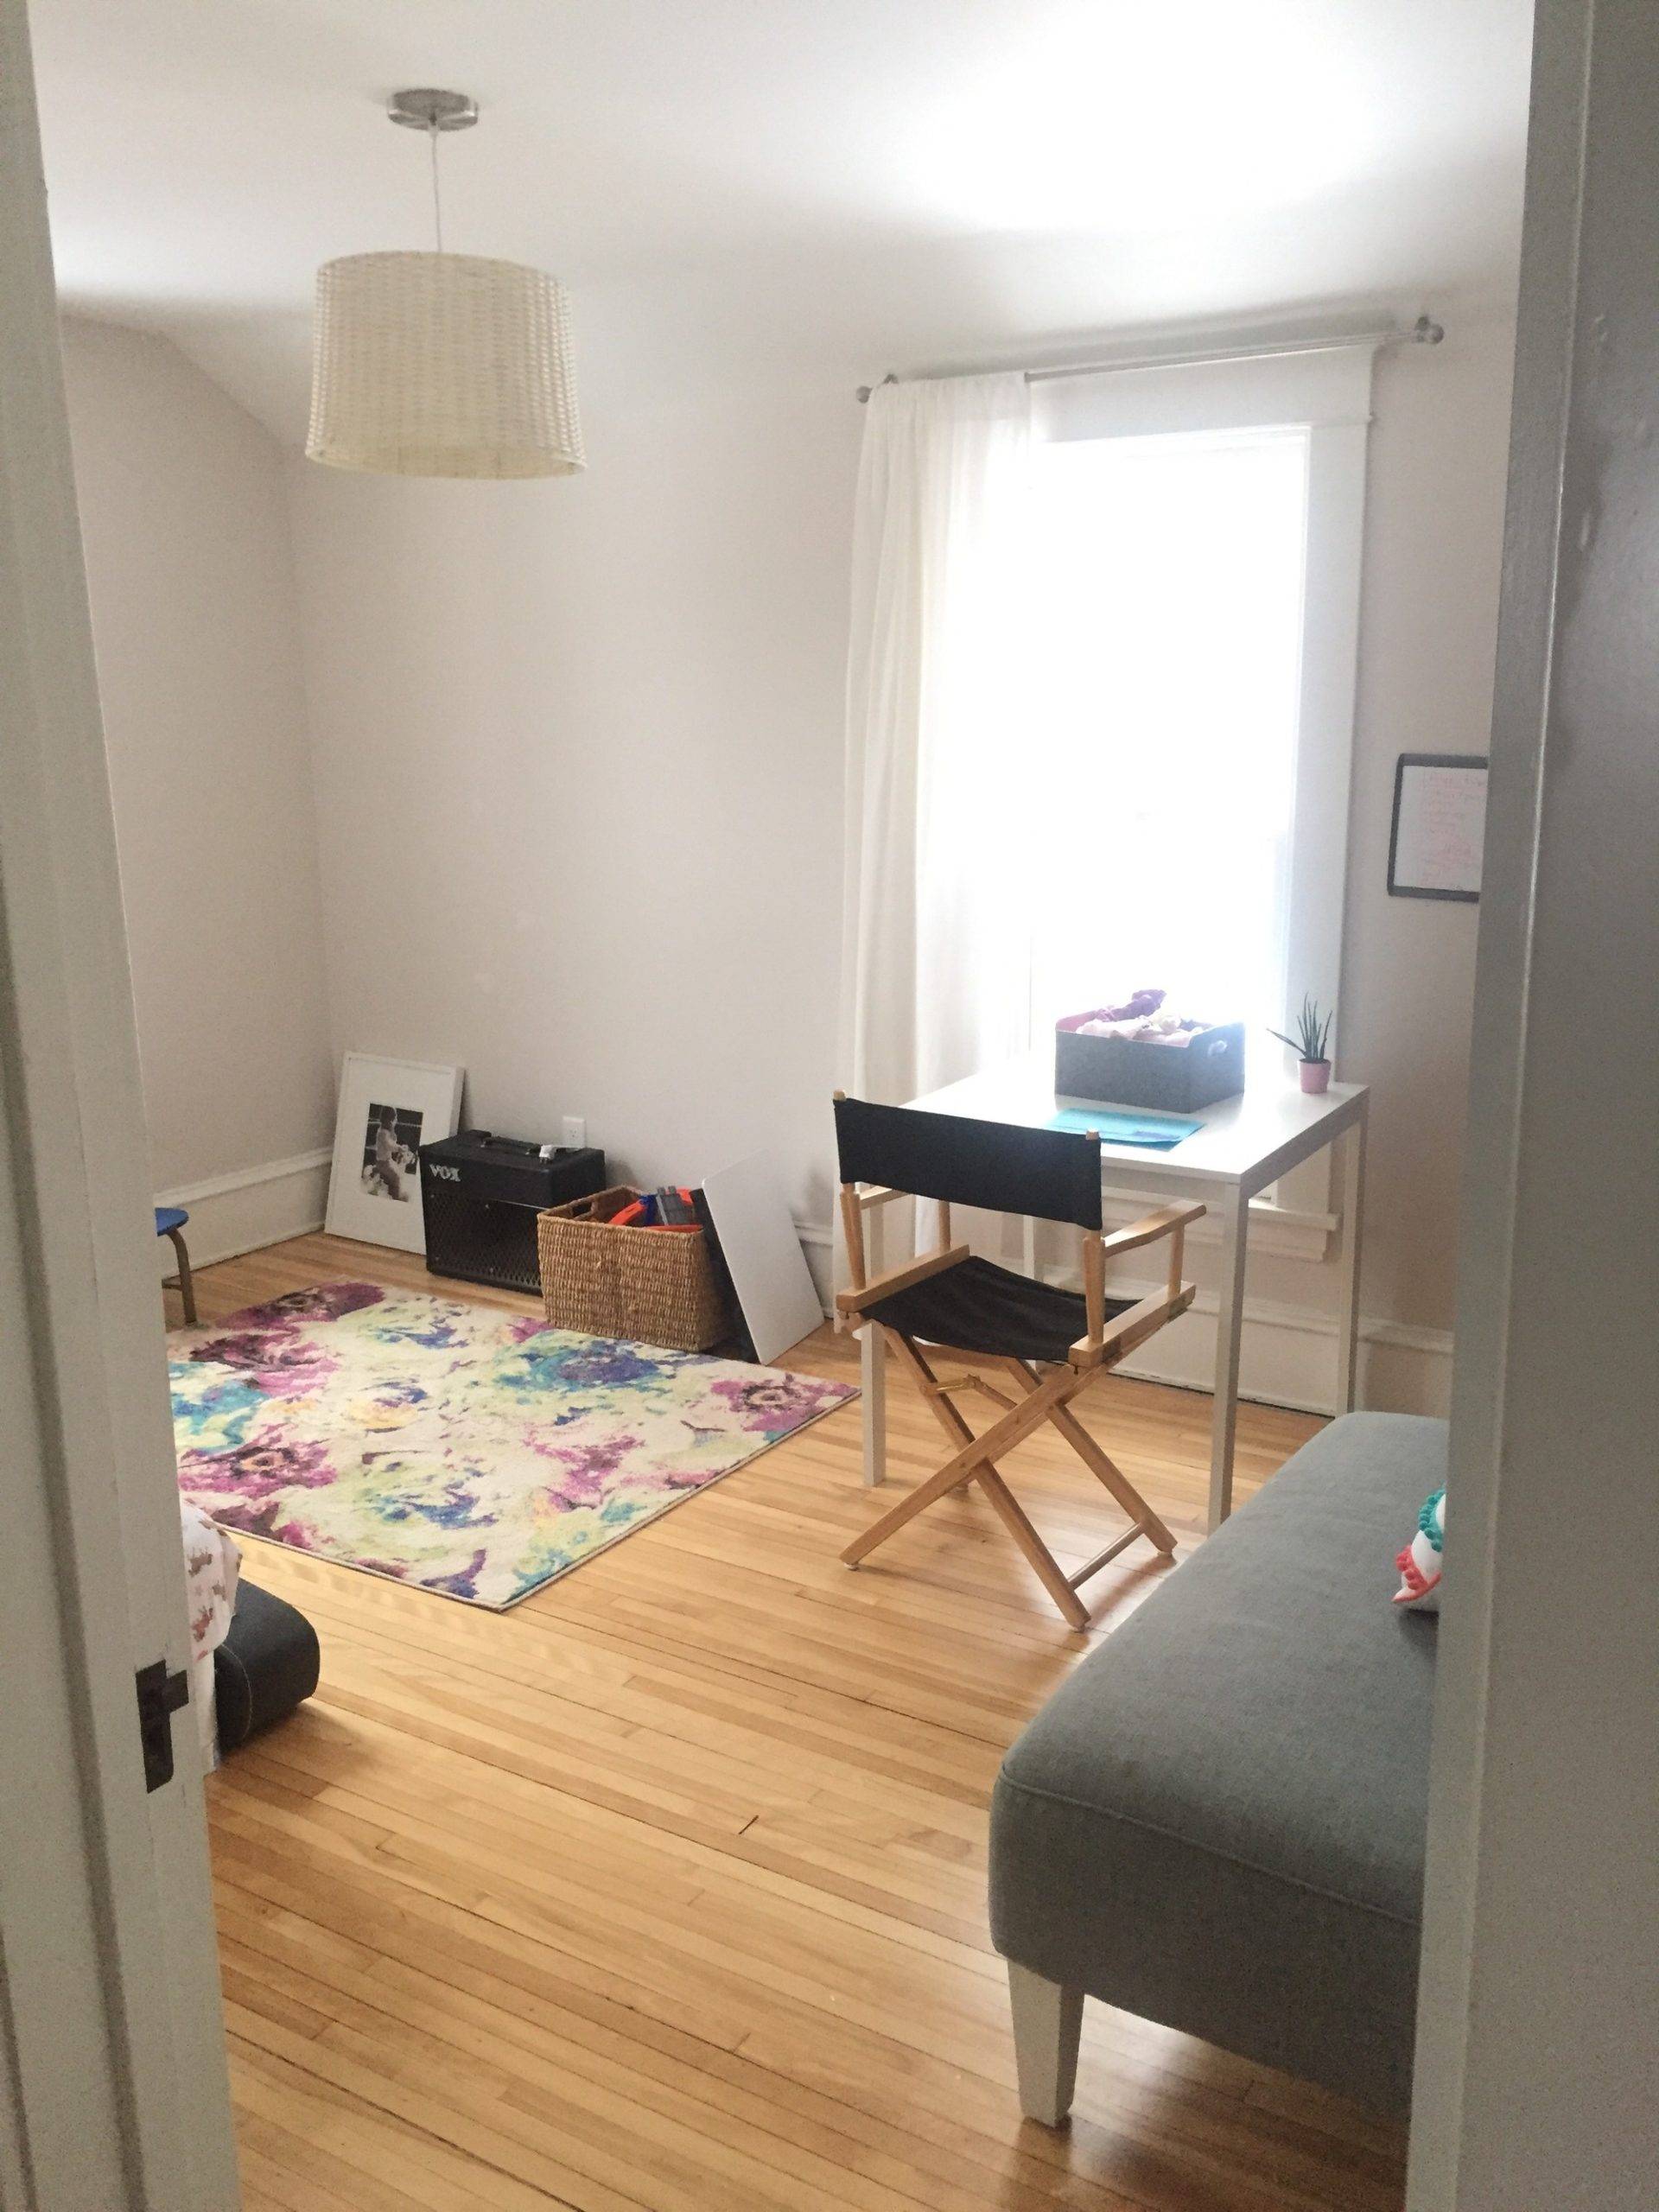
We recently completed a room makeover in our home, transforming an empty bedroom that served as a storage/play/catch-all nightmare room into a cozy den. The foundation for the whole room was a fresh coat of paint, and we were eager to experiment with spraying the walls vs. rolling and cutting in.
The Prep Work
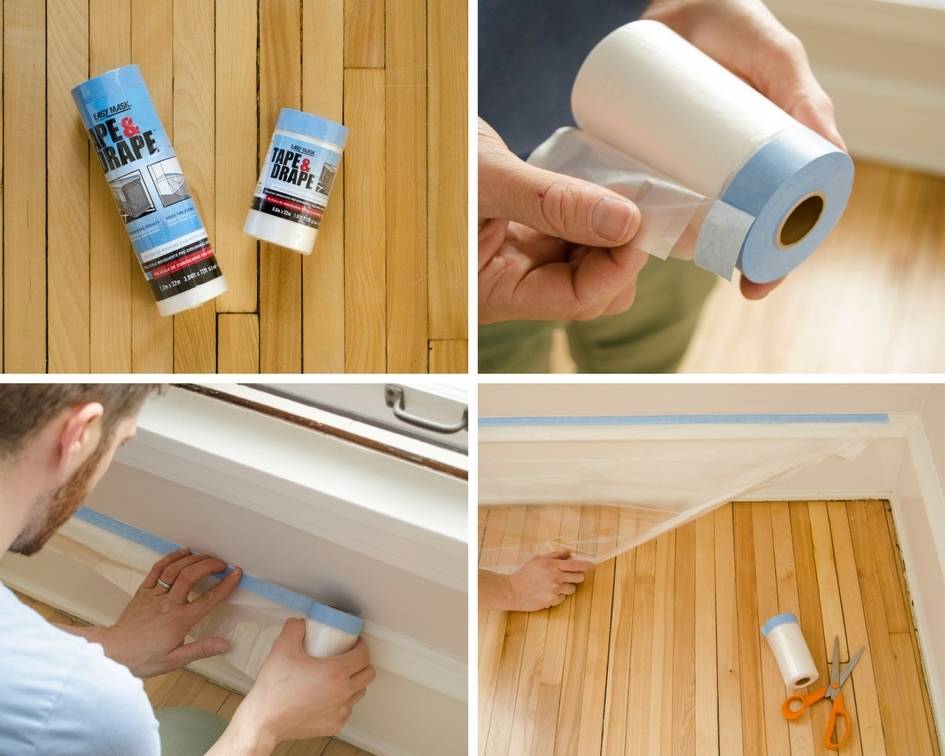
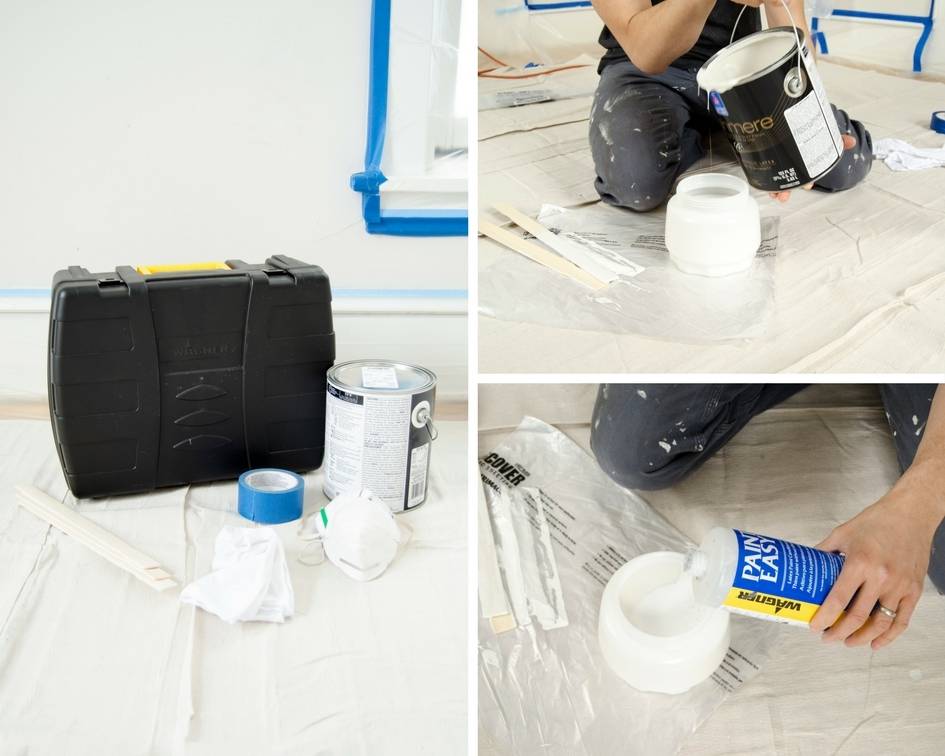
Spraying the walls of a room will save you loads of time – like, hours. But, you have to prep your room in order to ensure total success. And that prep work depends on having the right masking and surface protection products. We used a few key supplies from Trimaco to make sure our room was prepped correctly.
Trimaco makes all the painting jobsite protection products professionals use, and they have something for everything you can think of. When spraying a room, don’t be intimidated by the prep work – the truth is, even if you’re just rolling and cutting in, you’d have to do the same amount of prep (taping around windows, trim, and baseboards).
We used two products that are an absolute must if you’re spraying a room:
– Tape & Drape: pre-taped masking film makes covering windows, doors, and other surfaces super fast and easy.
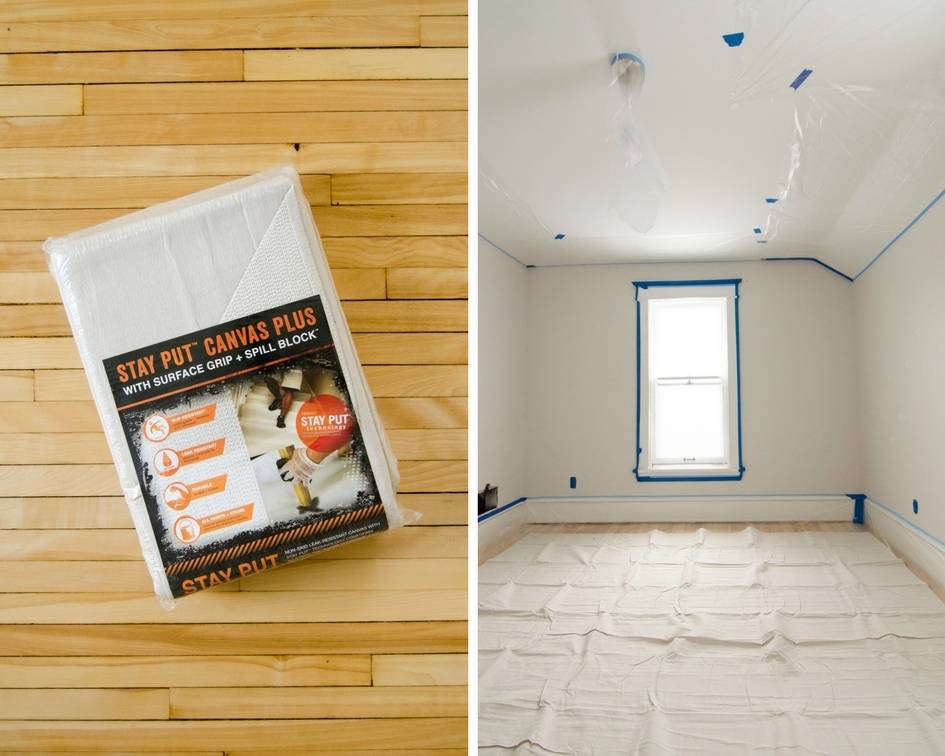
– Cling Cover: self-adhering protective plastic sheeting. It clings to almost any surface and also attracts over-spray and dust.
Here’s how it all went down:
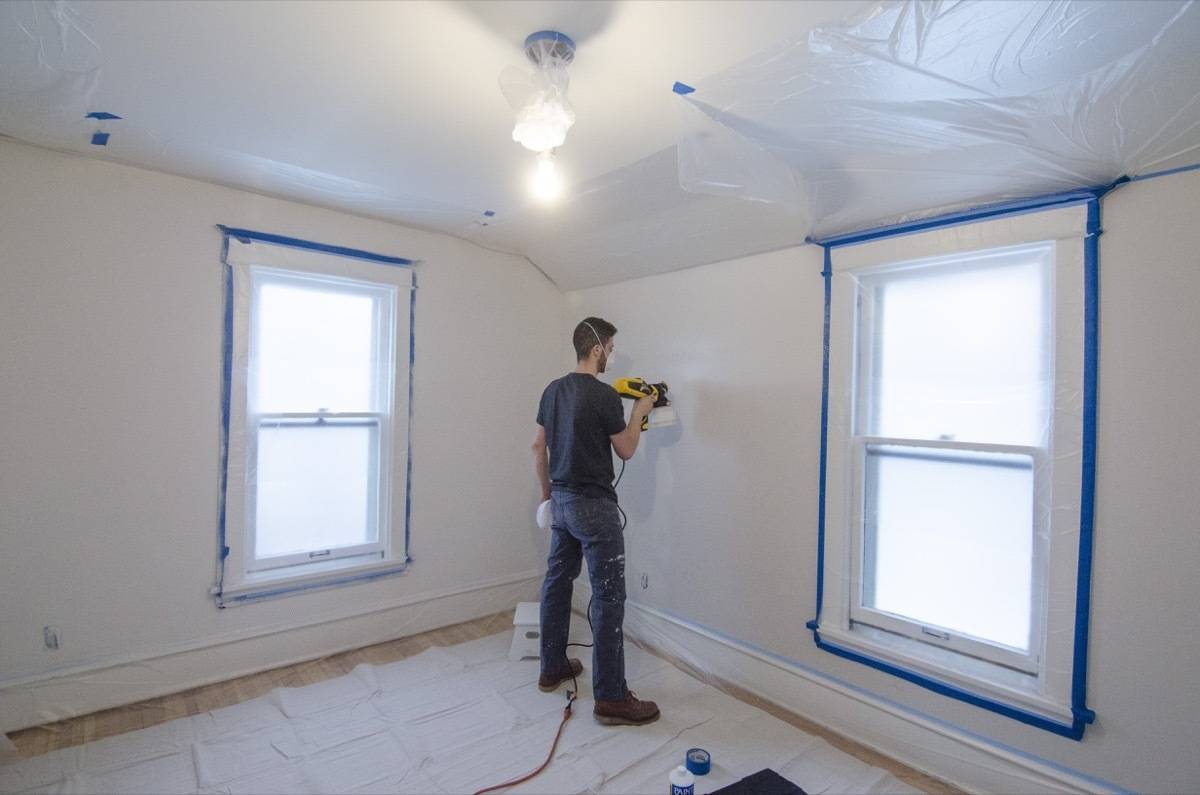
We taped around all the windows and baseboards using Trimaco’s Tape & Drape painter’s tape. This tape it the bomb! Why? Because it comes with plastic attached to it. You simply apply the tape to the trim, then pull the plastic out to create big swaths of coverage. We applied this same tape along the ceiling line.
We covered our floor with a giant, non-slip drop cloth from Trimaco. Adding a tacky back to underside of a drop cloth was somebody’s masterstroke because it stays put!
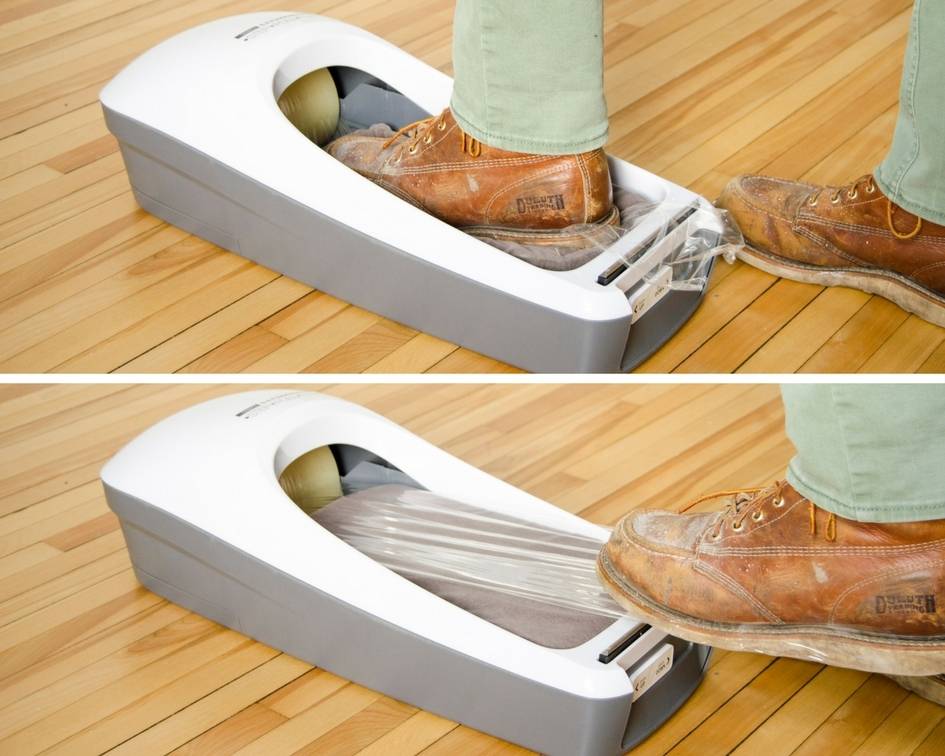
Bruno is gaga for gadgets and he likes to keep his work area super clean, so he insisted we wear plastic coverings on our feet. This was not totally necessary for a job like this, but this floor guard for shoes would be a great addition to a winter cocktail party where people want to keep there fancy shoes on in your house. I’m kidding … maybe.
How to use a Paint Sprayer in an Interior Space
We used the Flexio 590 Handheld Paint Sprayer. It’s perfect for an interior paint job like this, because it can cover an 8×10 foot space in 5 minutes! Before spraying, we added our paint to the sprayer and mixed in a bottle of Wagner’s Paint Easy additive to thin the paint and help it go on smoothly. Don’t let the notion of thinning your paint fool you into thinking the coverage will be poor. When paint is applied through a sprayed mist, the super-fine droplets land and attach to one another, making the finish smoother than the voice of Barry White.
Despite the fact that it was freezing when we painted the room, we opened the windows a bit for ventilation. I think anybody who paints indoors does this, but it’s especially helpful when spraying a room, because you have paint particles hanging in the air. Wearing a mask is also important – it keeps the misty-fine particles out of your lungs. That said, the Flexio 590 doesn’t over-spray nearly as much as you might guess. You won’t feel like you’re painting in the clouds.
Bruno painted all four walls of the room in 20 minutes. That’s it. 20 minutes and he was D-O-N-E. No second coats, no touch-ups. Can you even?
Here are some of our best tips for using an indoor paint sprayer:
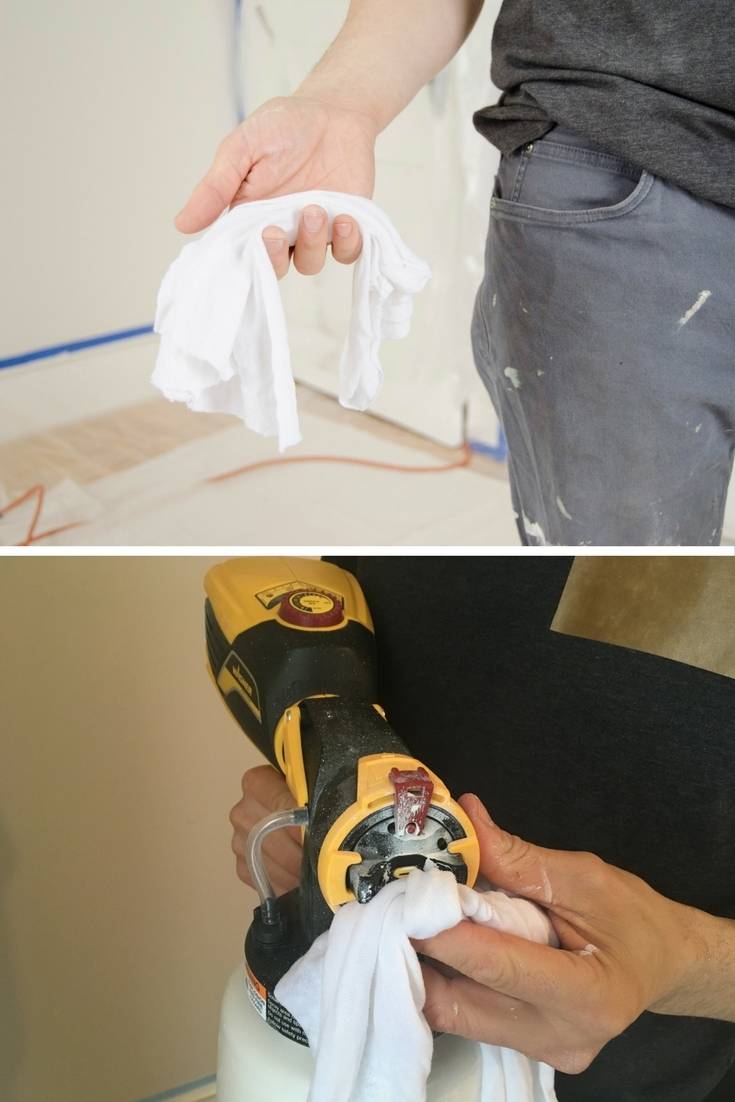
1. Keep a damp cloth in your pocket to periodically wipe the tip of the sprayer – it can get blocked as the paint begins to harden. This is important! You’ll need to wipe the tip more often than you think … but doing so will keep the sprayer from clogging and splattering. If your paint sprayer won’t spray, it’s often because the tip is clogged with dried paint. Keep it clean and you’ll have great results.
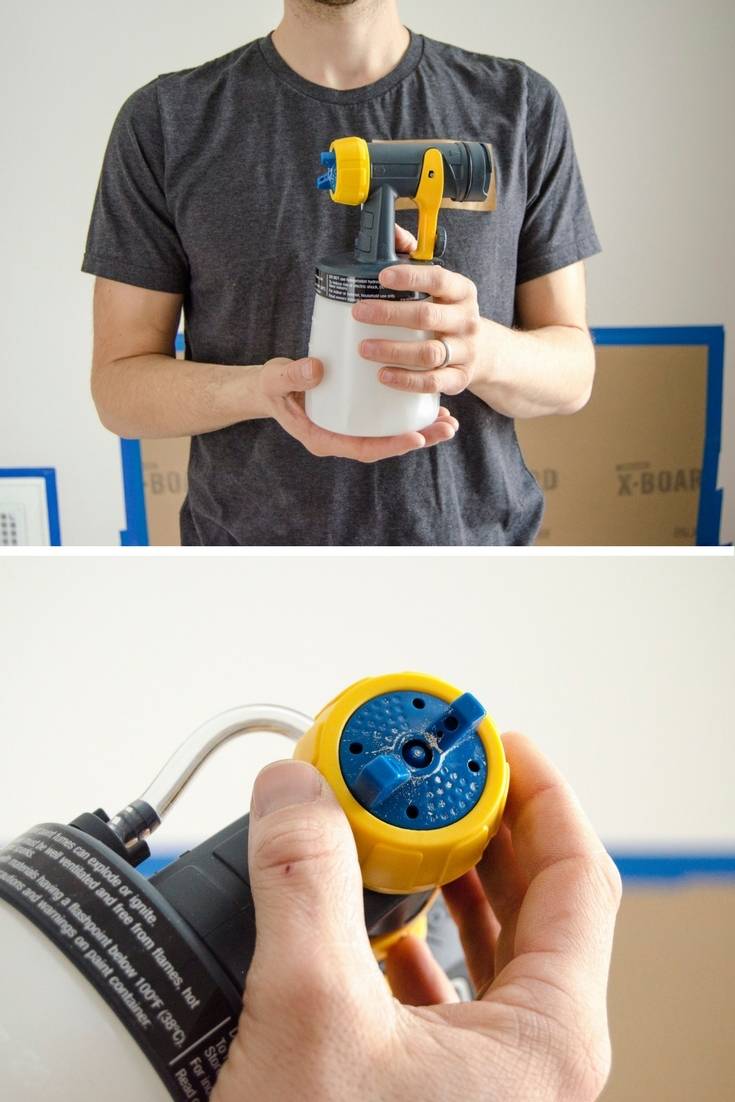
2. Learn how to adjust the sprayer nozzle to change the spray pattern. A horizontal nozzle position creates a vertical pattern; a vertical nozzle creates a horizontal pattern. Putting the nozzle at a diagonal will generate more of a round spray pattern.
3. Stand close to the wall and keep your sprayer 6-8 inches from the wall. The further back you go, the wider and thinner your painted area becomes. Standing close to the wall helps you get a nice, thick coat on the first try. You want to keep the sprayer closer to the wall than you think; if you feel weirdly close, you’re probably doing it correctly.
4. Apply the paint in strokes (we like horizontal strokes), and pull your finger off the trigger at the end of each pass to let the paint trail off (rather than doubling up an application by continuing to run the sprayer row-after-row). Overlap each spray pass by about 50% to ensure full coverage.
This video on how to use a paint sprayer was extremely helpful in getting us up and running:
We let the paint cure for an hour, then I removed all the painter’s tape and plastic film. We folded up the drop cloth, and the room was a perfect blank canvas set to become all denned out!
Before we show you all the pretty pictures of the finished room and talk about the design process, I really want to make sure you understand how smooth and efficient the painting process was. I feel like we have a golden key to Paintsville, and we have an obligation to pass on the ease of this method. It is a game changer. It makes painting so quick and easy. Try it out. I promise you’ll breakup with your roller and your old ways.
A Little Bit About the Den Transformation
For years, Bruno and I have been unsure about how to use the empty bedroom on our second floor. When we first moved in, it served as our baby boy’s nursery, because our house was still under construction and our master bedroom was not complete. Once our remodel was done, we moved him into a larger bedroom, and this little room met an ugly fate: The room where all the misfit toys and furniture lands. I know many of you have a room (or closet) that’s befallen this same sort of fate. It’s a luxury to have a room like this, especially because you can close the door and kind of forget about it. But, it’s also a big bummer. It bothered me that this totally legit room was being used for such a lousy purpose.
Bleh… what a shame of a room.
We wavered between making it a guest bedroom (it wouldn’t get much use that way) and turning it into a den. Bruno was fairly opposed to having a television on the second floor near our peaceful bedrooms. But, our current first-floor TV situation wasn’t working. Because of the configuration of our sunroom, the only furniture we could sit upon to watch a movie was a loveseat. We did this for years, spending many Friday movie nights with kids on our laps. But, our kids are now way too big to do this comfortably, and it was becoming more and more apparent that we needed some kind of family-friendly sofa in our lives.
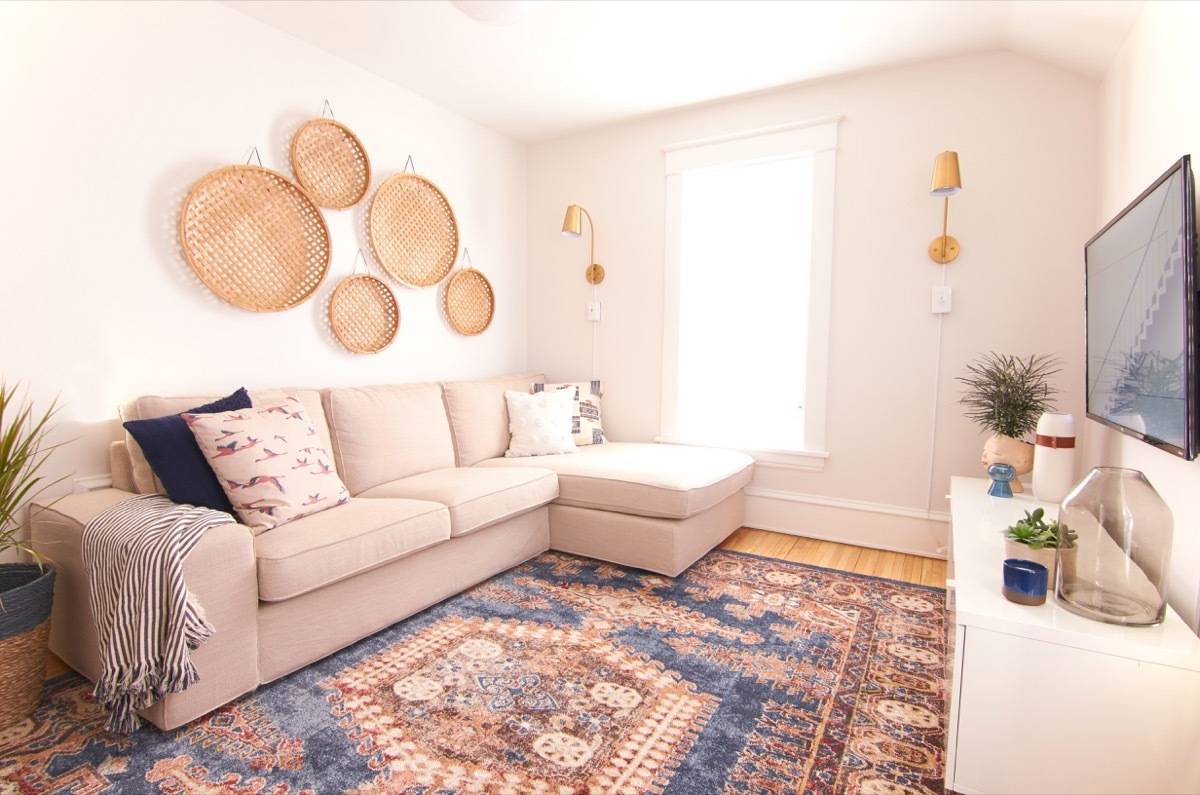
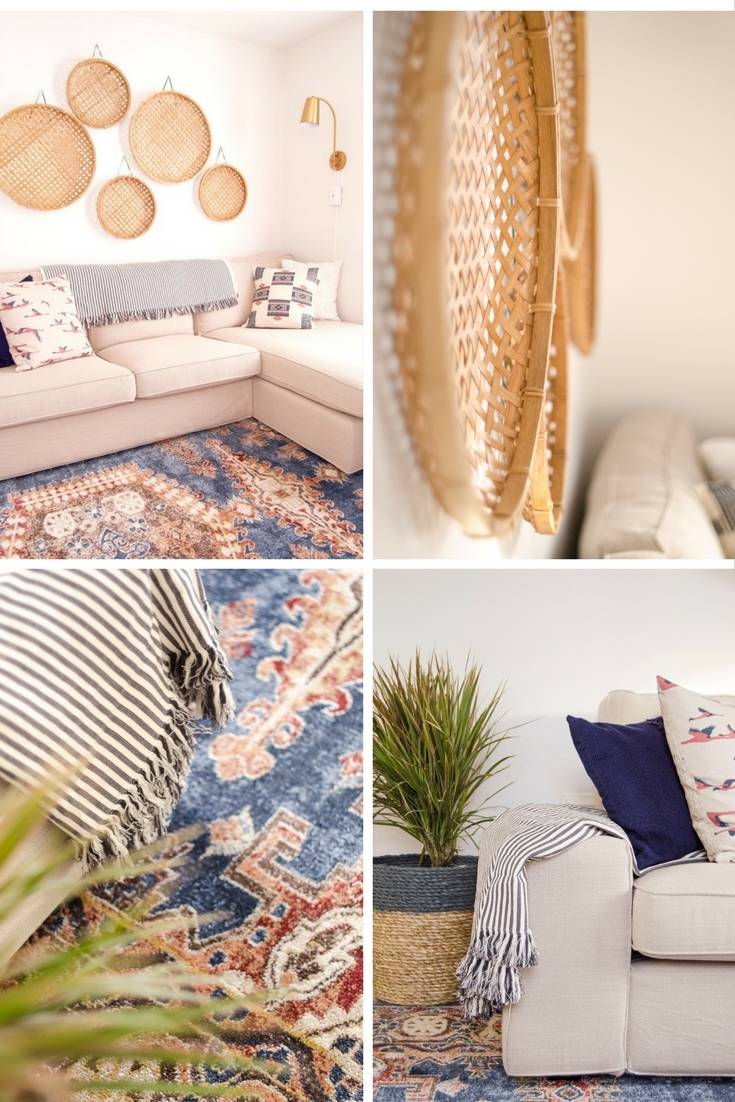
So Bruno got onboard with the second-floor den idea, and we made it happen in two weeks! We ordered a rug, chose a comfy sofa with a chaise (the best seat in the room), and bought a slightly larger television (but not a giant screened beast, because I’m completely opposed to them and don’t ever want to feel like I have an actual movie theater in my home – I like going to the movie theater for that kind of thing).
Here’s how the room came together:
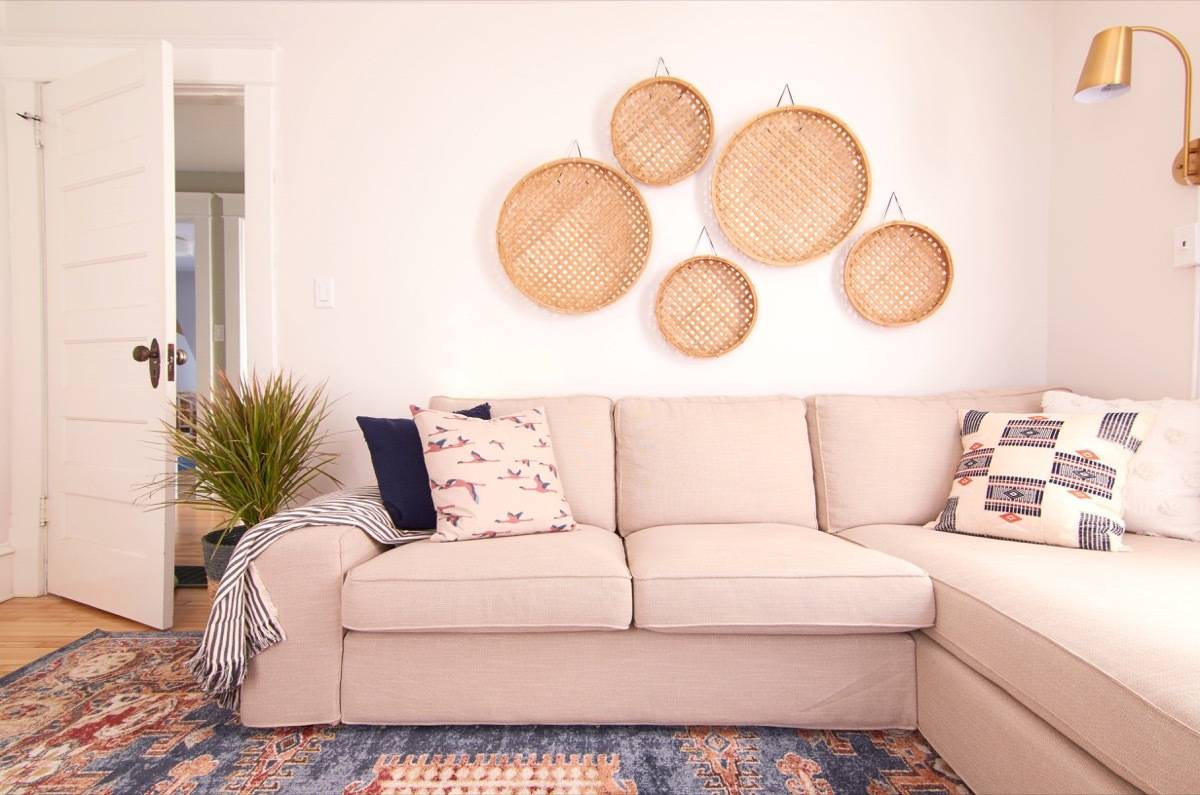
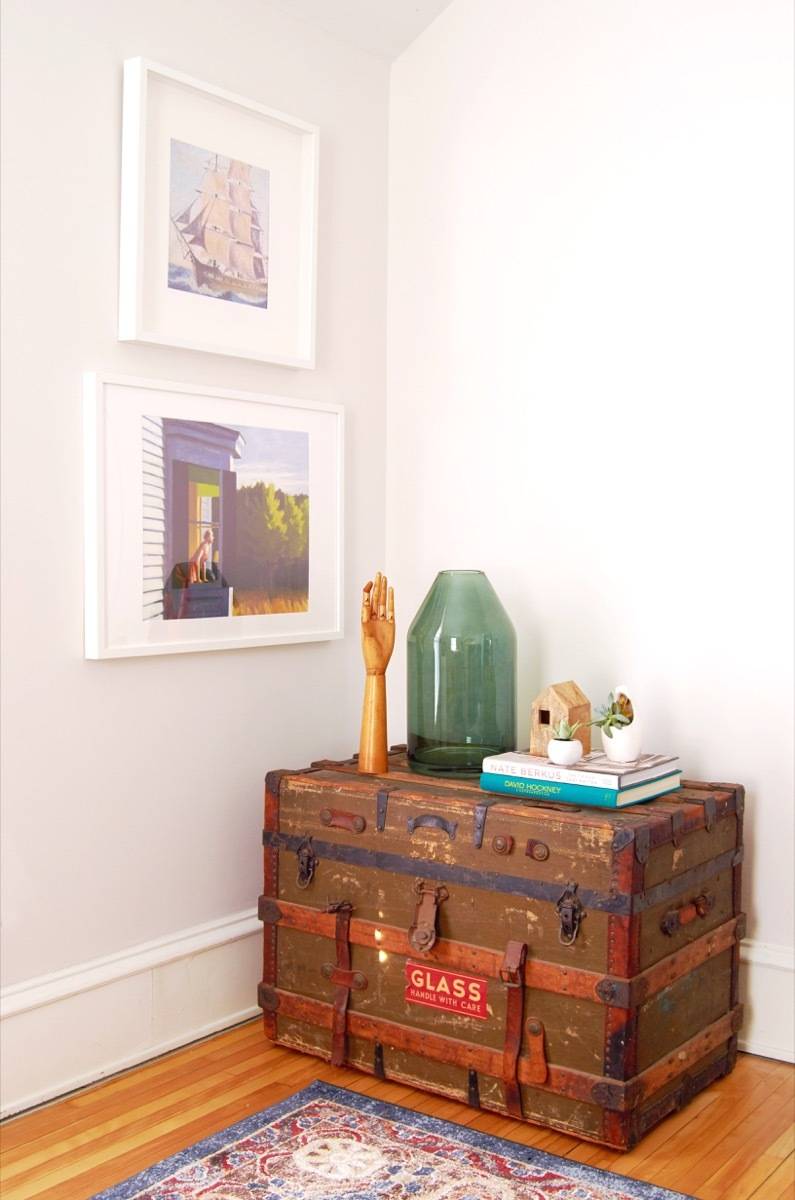
I really love it. It feels a little more country/boho than anything we’ve designed before. But, this is exactly what I love about it. It’s super cozy and understated, but a little hideaway-y and retro (the wall of wicker baskets is very 60s & 70s). And yet, it still feels like it belongs in our house.
We’re in love with our sweet, little den and thrilled with the ease and swiftness of the room’s transformation. I hope you’ll give spraying a try the next time you paint a wall because it’ll save you so much precious time, and the results will be stunning!
Thanks to Wagner and Trimaco for sponsoring this post; all opinions are mine alone. And thanks to you, for supporting Curbly and the brand partners that help keep us going!
This month, Krylon is sponsoring a series of thrifty, creative DIY projects:
I often say our porch is my favorite room in the house. It was horrendous when we moved in; floors covered in green artificial turf, holey screens heavily framed in rotting wood, paint chipping, and floor slanting. (It’s still slanted, “for drainage.”) The above photo was taken in the winter, making the porch even more drab, but it certainly gives you an idea of our canvas.
Happily, over the last several summers, we’ve touched every surface of the porch, transitioning it from gah-ross to gah-reat! This summer we’ve been working on the porch furniture with the help of several cans of Krylon spray paint. The first project we tackled was the coffee table(s). Our ‘true’ before pictures were lost forever (due to an untimely iPhone crash … Ah!). However, below you will see the brown tabletops with red legs (Bruno did some Photoshopery to give you the idea). Using your imagination, picture the tables in total brown … and you have our true ‘before’.
(Again, since my true ‘before’ pics were lost forever, this is photoshopped to give you an idea)
The current tables on our porch are actually two side tables that lived in Bruno’s apartment back in his bachelor days. We kept them around because they were sturdy wooden tables that work well outdoors-ish. Most of the time, we scooch them together to form one coffee table, but we like the fact that they can be split apart when we have guests over, transforming into side tables or foot rests (or both, simultaneously!).
We came up with the idea to paint our tabletops with chalkboard paint so our two-year-old daughter, Ayla, would have the opportunity to grace yet another surface with her artwork. We began by hauling the tables out to our outdoor work area and spray painting the bases and legs with Krylon’s “Cherry Red” spray paint (we opted for a glossy finish).
The process was really pretty easy. Since we hadn’t spray painted wood furniture in a while, we took a quick look at some of the FAQ on Krylon’s Web site. The most helpful tips were the reminder to begin and finish your strokes off of the object your painting. We also heeded their advice and tried to use several light coats (2-3) instead of laying on one thick coat. We ran into this issue right off the bat and had some drips that we later sanded and re-sprayed.
The project took more paint than we were expecting (almost 2 full cans) because our initial coat was a bit too thick, requiring some sanding and re-painting. And the table legs had quite a few angles to tackle. The issues we ran into were strictly user error, and we’re happy to report that we gained a little bit of finesse each time we worked with the paint (some of the later projects we sprayed were drip-free and easy-peasy).
After the legs dried, we used a can of Krylon Chalkboard Brush-On paint to cover the table tops. After three coats (I added an extra coat, ahem … because I’m obsessive compulsive … err, for good measure), the tables dried and were ready to go back to the porch, where they were met by one very happy artist.
We did this project over the course of two days; the table bases were spray painted several times on day one, and the table tops were painted by hand on day two. We allowed about 1-2 hours of drying time between each coat of paint, and were thrilled with the results (stay with us, folks, the real reveal is coming, keep scrolling…)
Once the tables were set, the old, hand-me-down rocker that served as Ayla’s porch chair looked a little drab, so we decided to tackle it with our leftover red (“Cherry Red”) spray paint and the leftover pink (“Watermelon”) spray paint we had from Ayla’s trike project.
We began by removing the rocker’s noise mechanism (it played a music-box-ish tune Every. Single. Time she rocked) and filling the hole with a little spackle we had on hand. Then we gave the entire rocker a light sand and made a painting plan. We decided to paint all of the chair’s spindles “Watermelon” and cover the rest of the chair in “Cherry Red”. The pink coats went on without a hitch and dried in a few hours.
Once the paint was nice and dry, we taped the pink surfaces with painter’s tape and started in with the red. The chair had lots of tricky little angles and surfaces, so the “Cherry Red” portion of the painting process took a little more time that we initially anticipated. We learned from the tables that several light coats looked better and dried faster, but required a little extra patience. So, I applied superhuman self-control and waited at least 30 minutes between each coat.
We actually managed to tackle the chair in one day, due to cooperative weather and an early start. We were thrilled.
Check back next week to read about our quick-and-easy porch lighting treatment makeover.
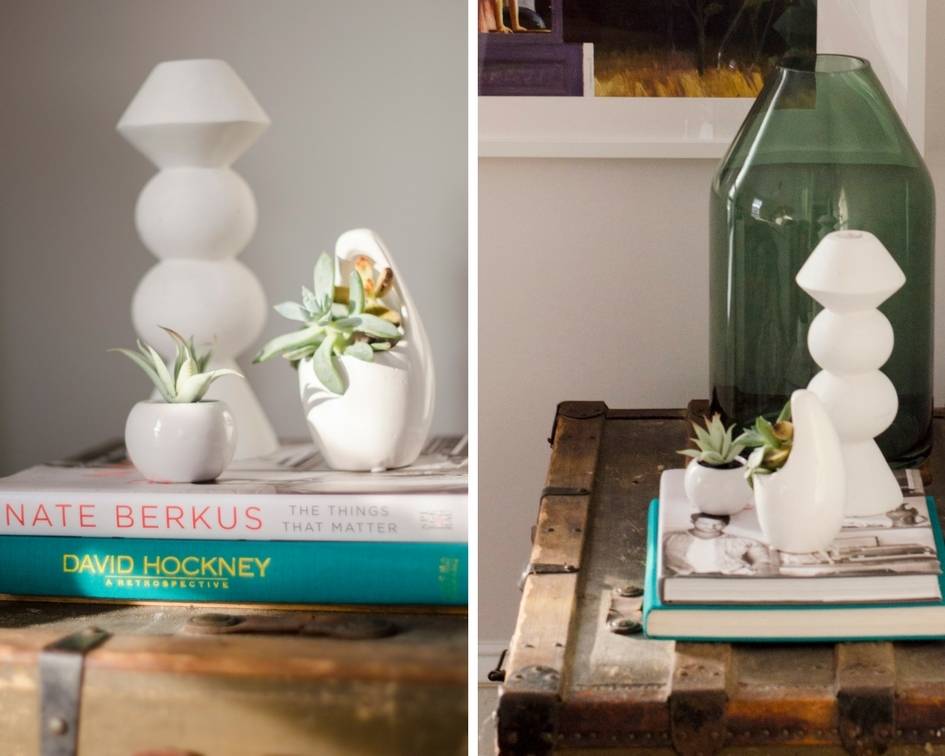
Plastic Easter eggs are abundant this time of year. You can find them in a variety of colors and sizes, and with a medley of super-heroes and princesses plastered across their round bellies. But when you strip Batman and Cinderella away, you’re left with a beautiful shape – the incredible egg. And, it turns out, it’s the perfect vessel for lovely arrangements of spring flowers!
Here’s everything you need to know about how to take a store-bought, treat-stuffed, plastic character-laden Easter egg from average to fantastically floral – in three easy steps.
Supplies
Large plastic eggs that split in half the lengthwise (ours were 5 1/2″ tall). They’ll probably sport ponies and hulks, but rest assured, they are easily stripped down. You’re just looking for a good, solid base.
Washi tape, vinyl sheets, or pom-poms.
Scissors
Flowers. Pick your faves!
Succulets or airplants
Moss
Step
Empty out all your character-embossed eggs and toss the tops. The bottoms are the only part you’ll need for this project, and they work well because they have a flat base. Decorate them with Washi tape or vinyl. We cut some shapes out of vinyl for crisp lines, and tore strips of Washi tape for a more organic look.
Step
Fill your eggs with water and fresh flowers. Have fun with this part! It’s really beautiful to mix and match a variety of flowers here.
If flowers aren’t your thing, you can create a more subtle arrangement with succulents and air plants on a bed of moss.
If your eggs have little holes that allow them to breath, be sure to cover them with waterproof tape before filling with water.
Step
Display your eggs. Put ’em on a windowsill, as a centerpiece, or on the mantel!
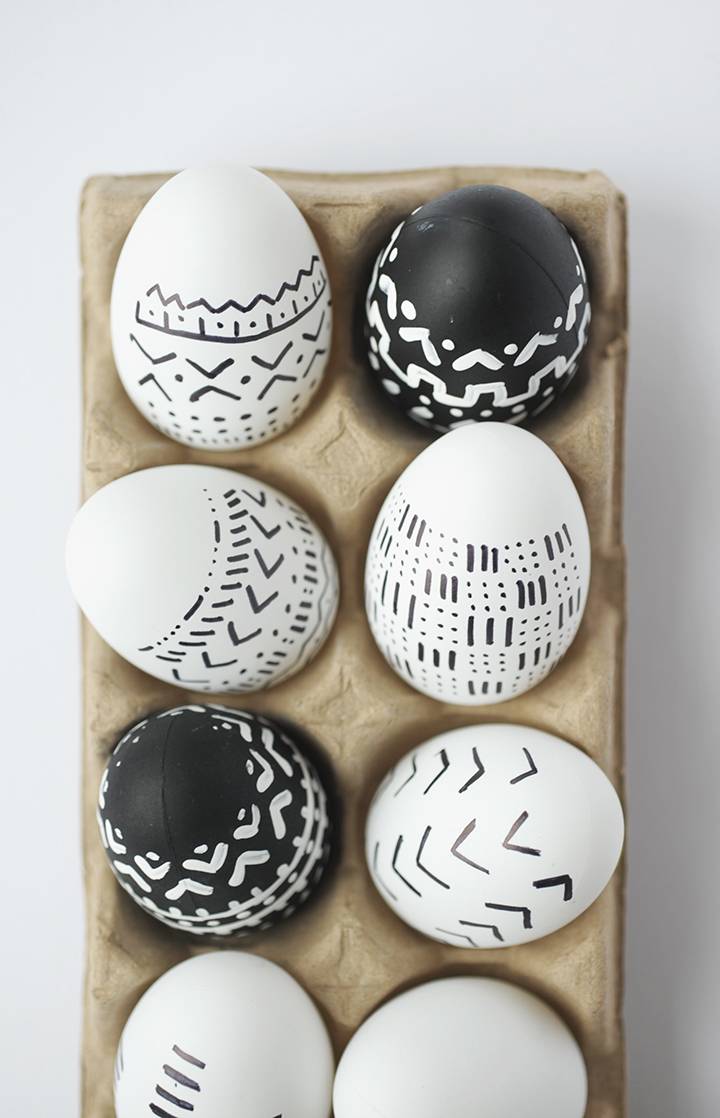
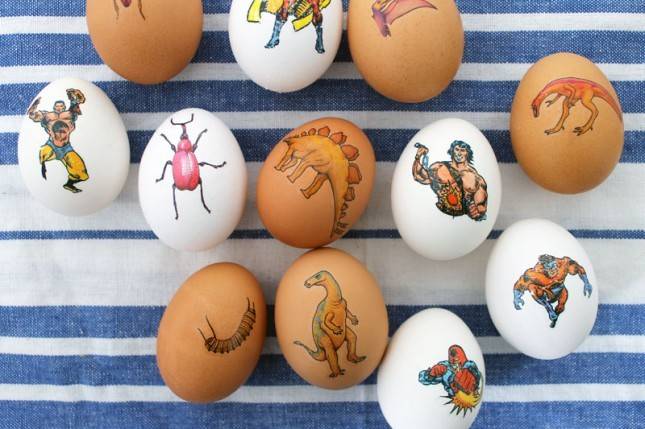
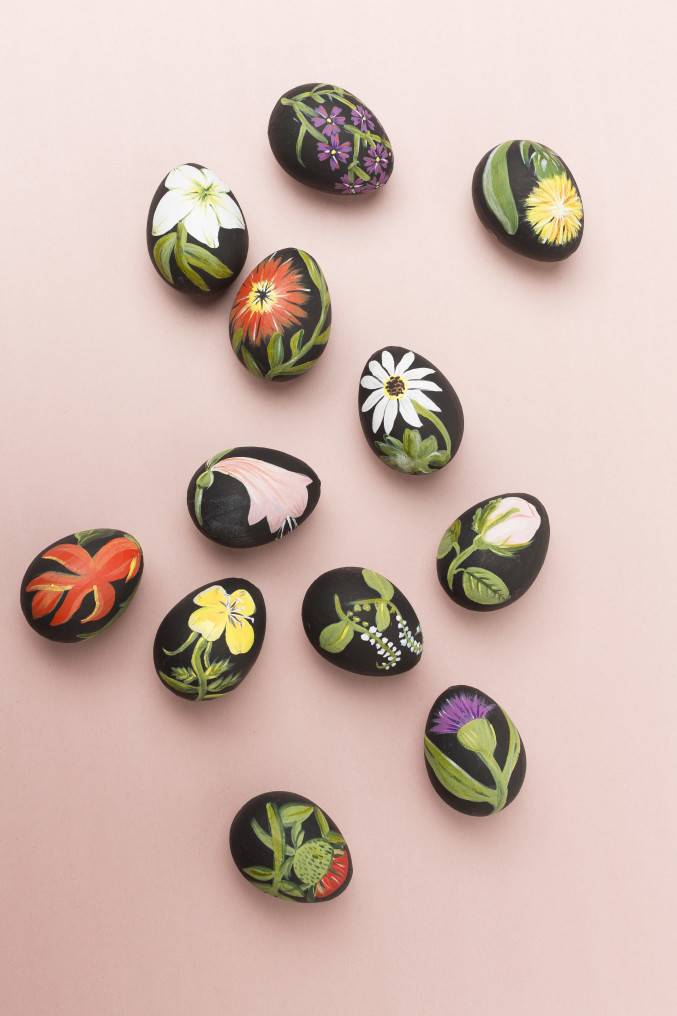
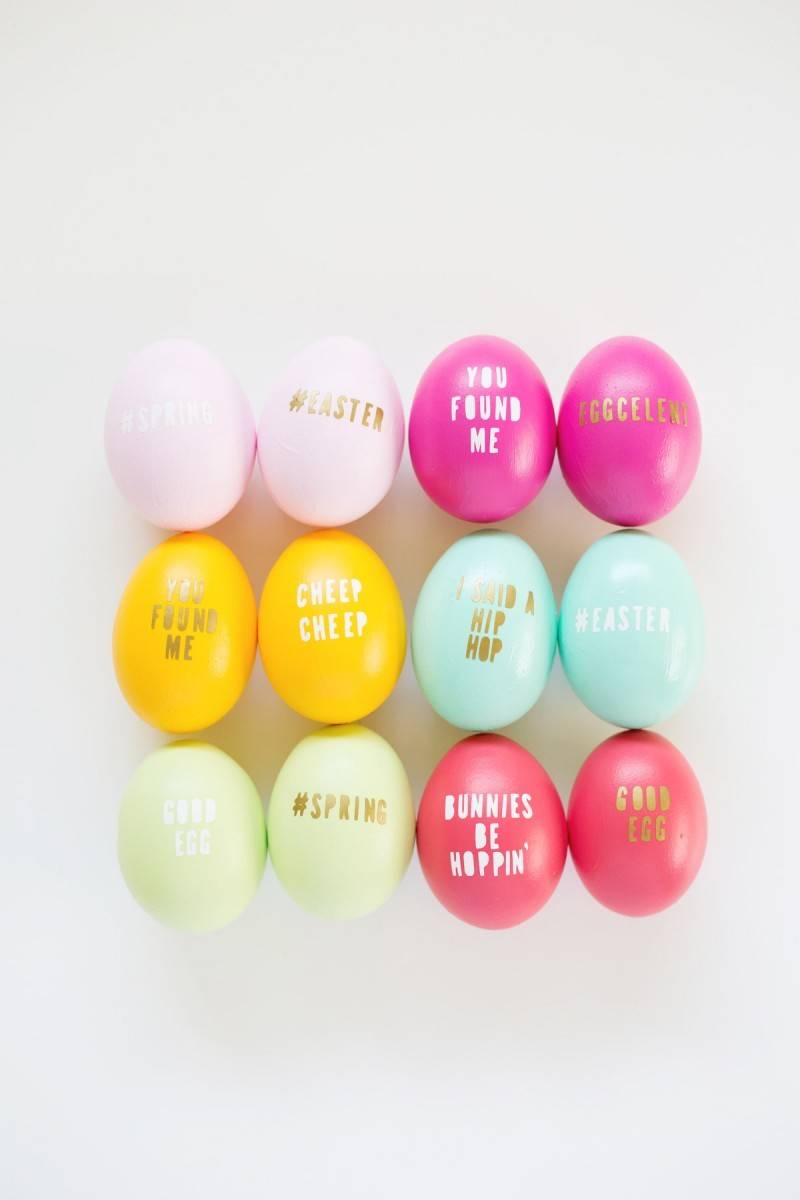
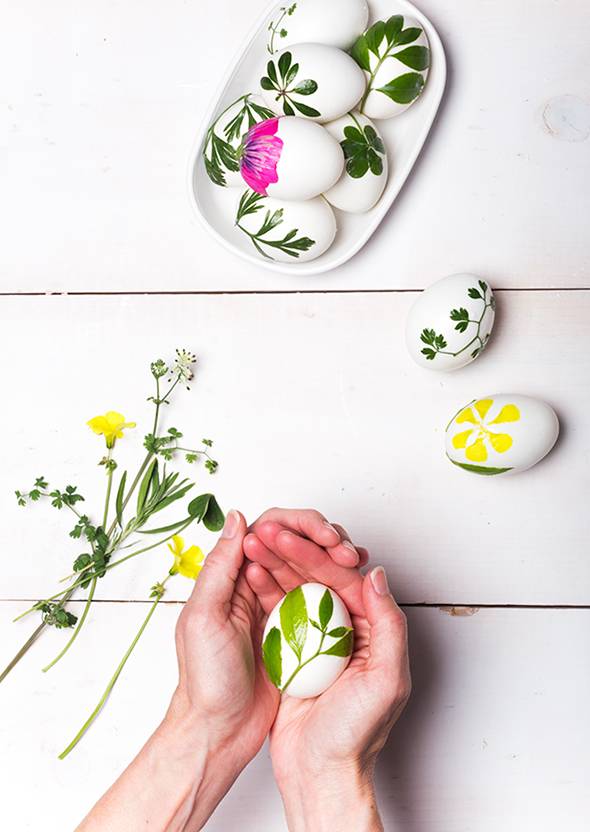
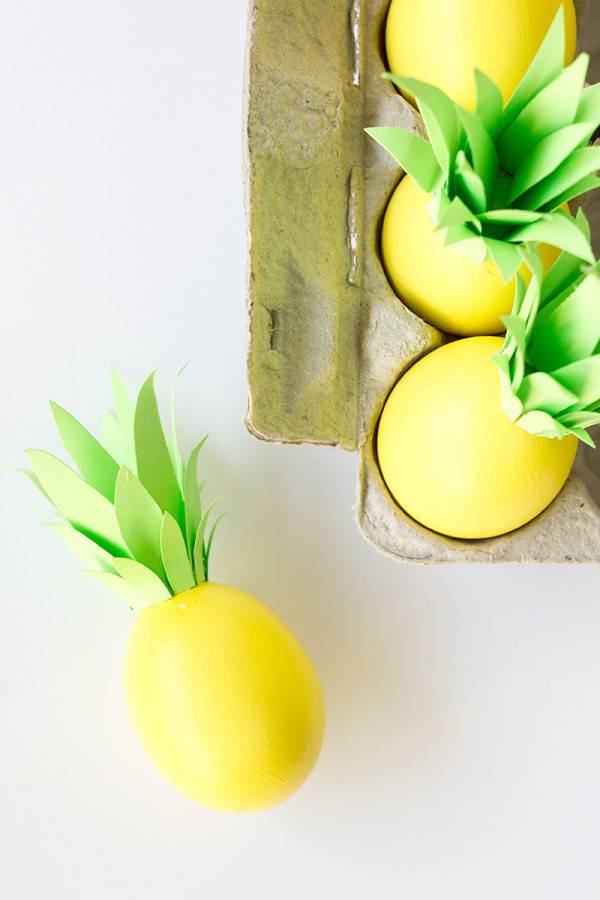
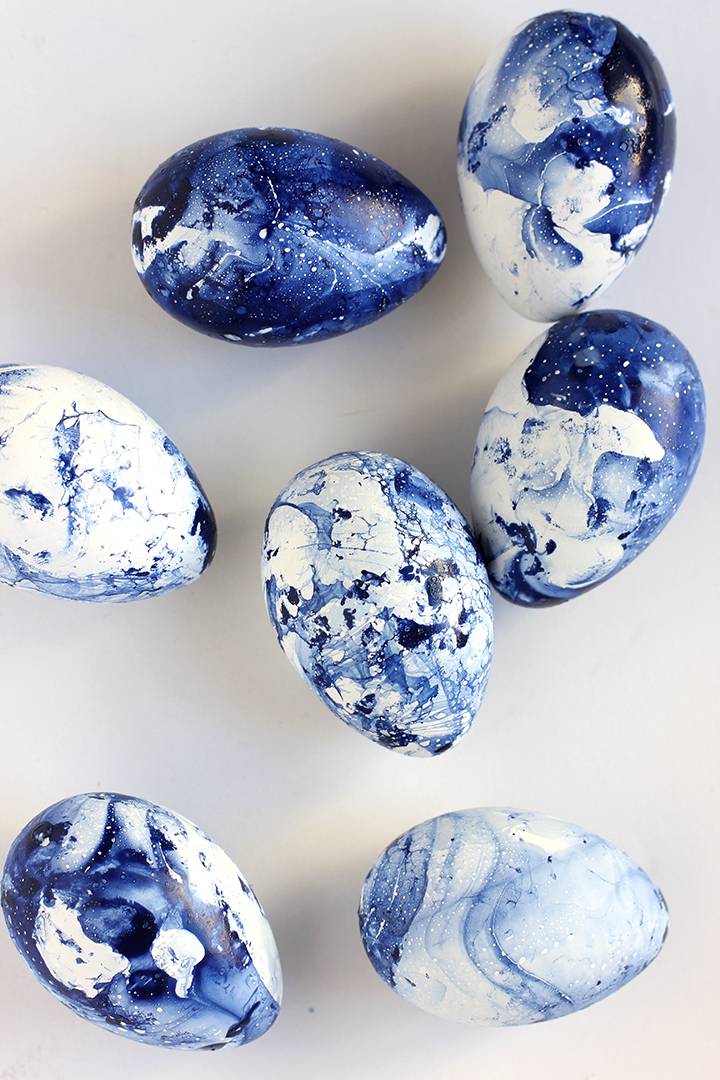
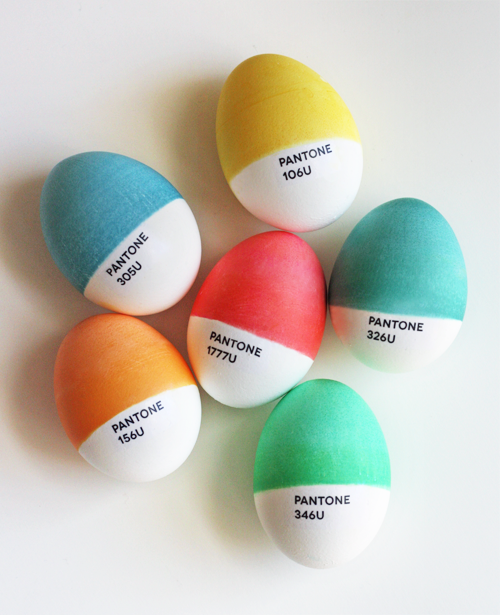
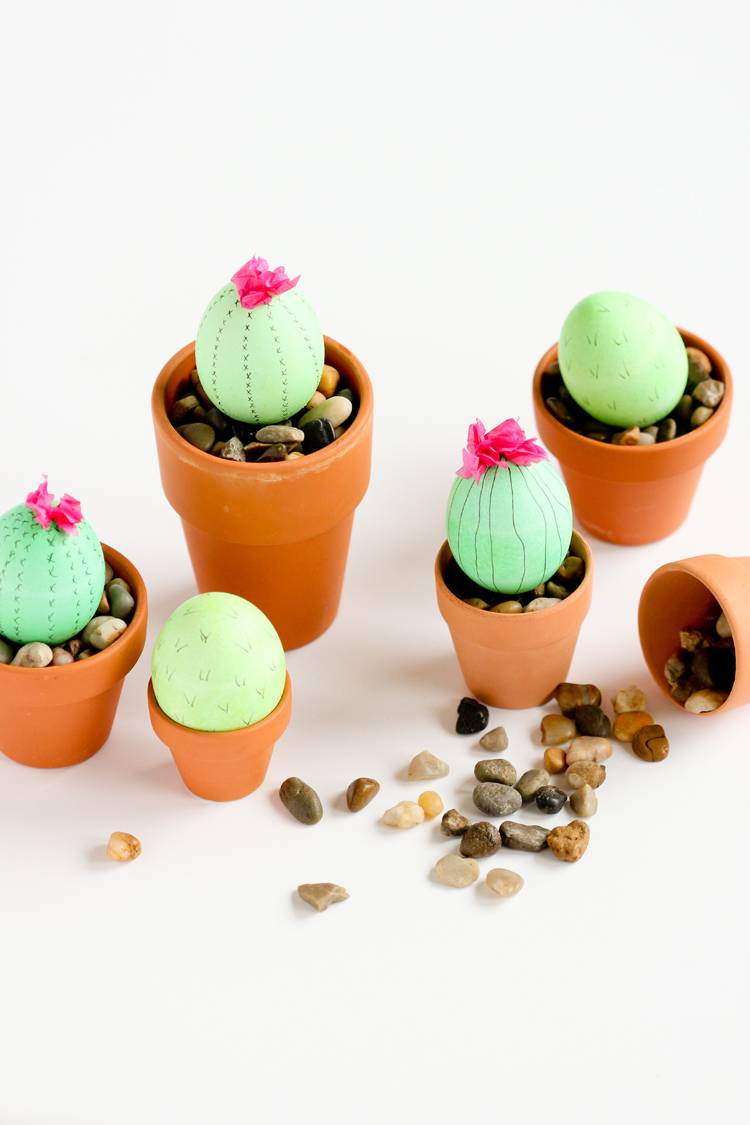
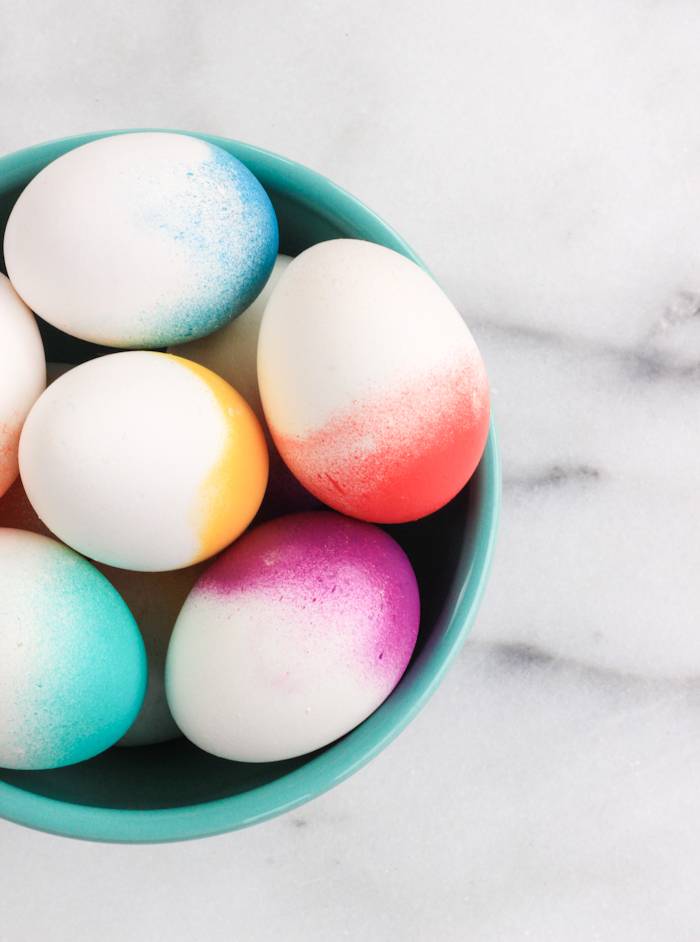
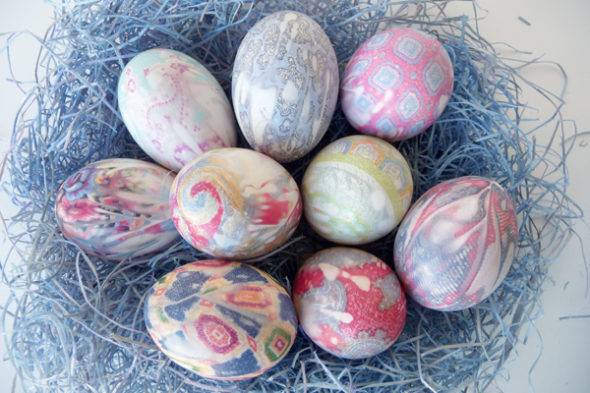
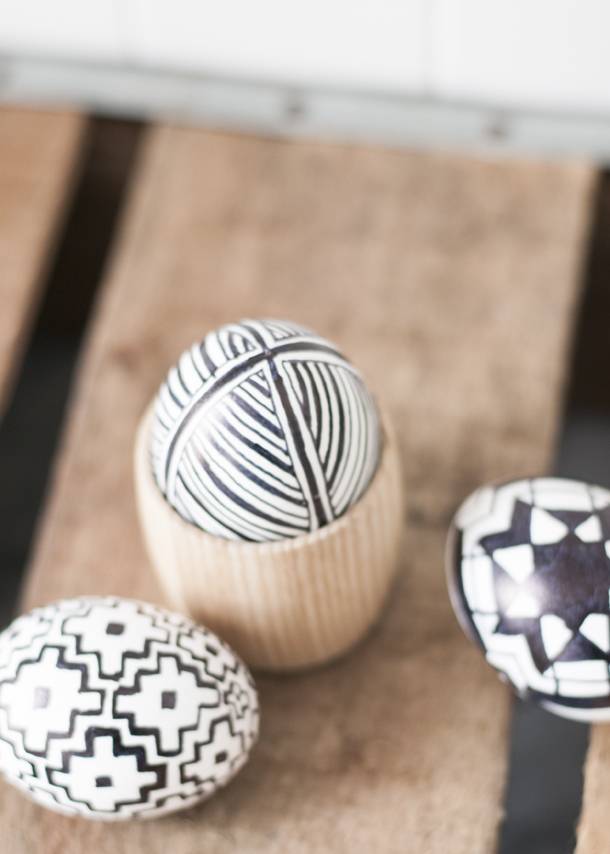
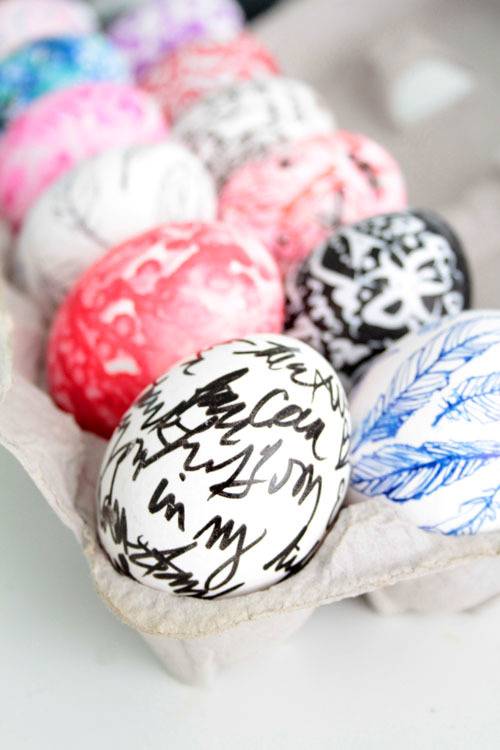
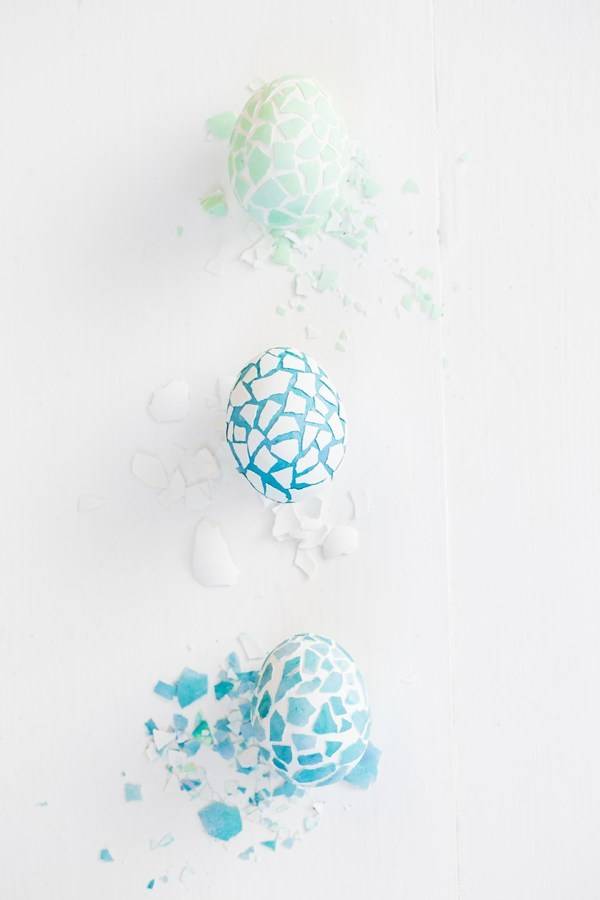
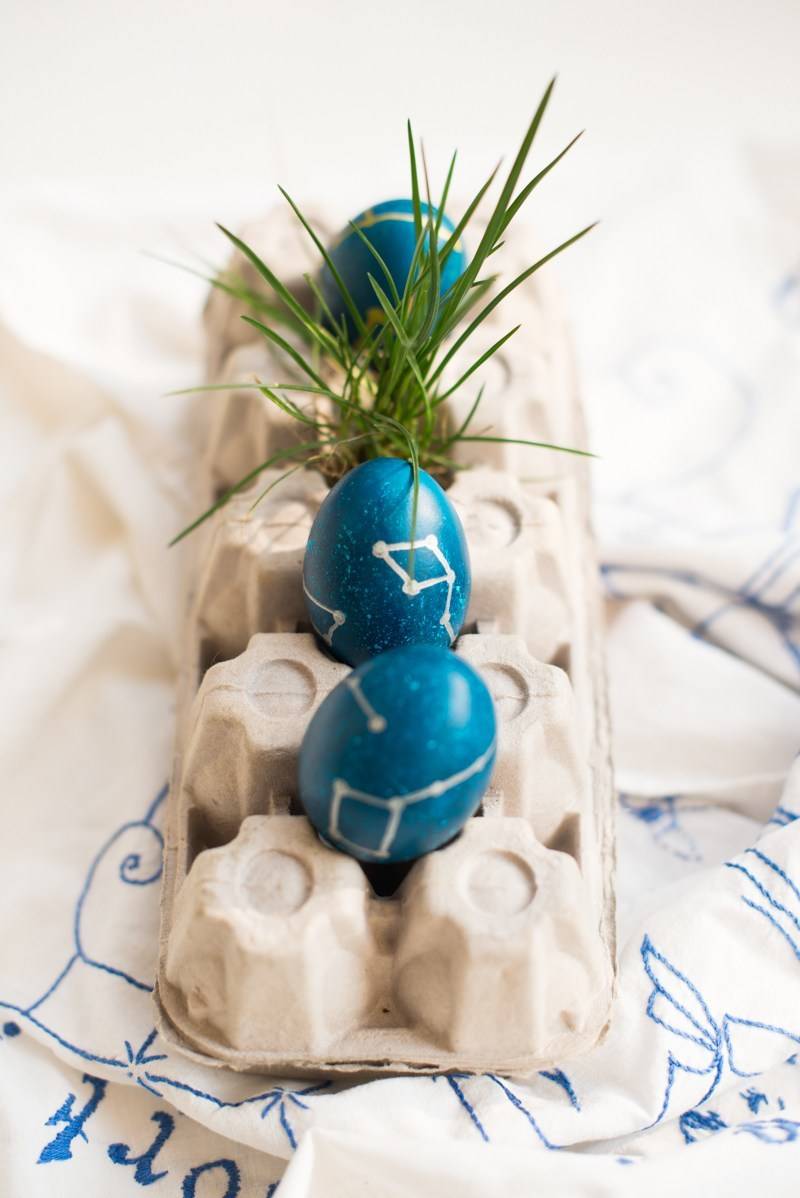
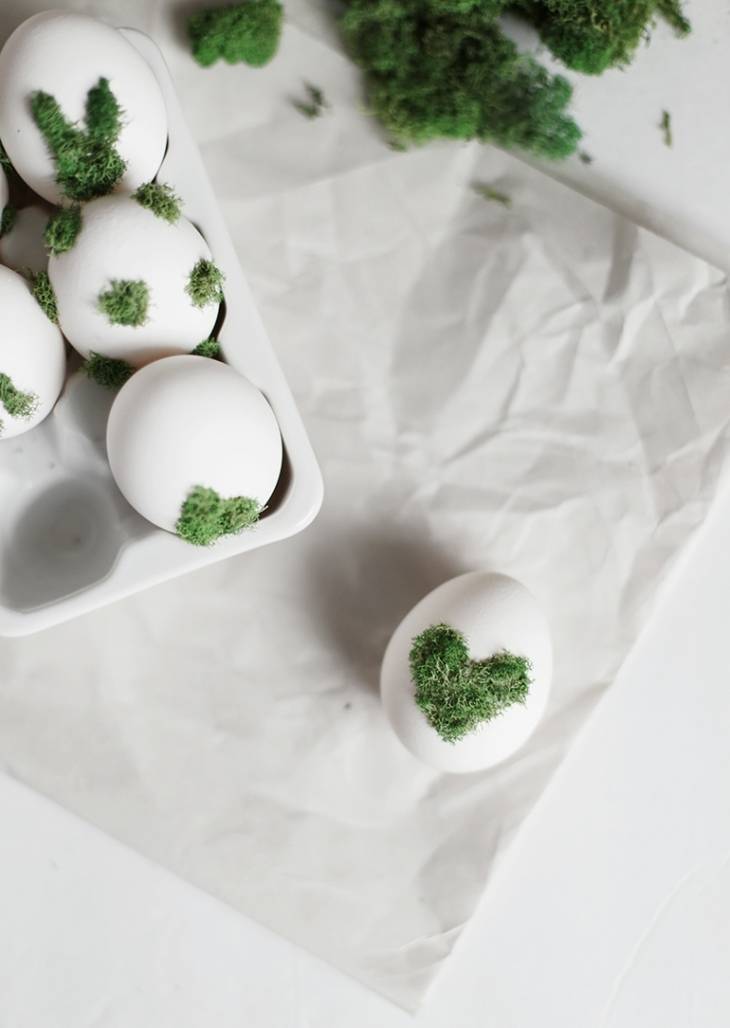
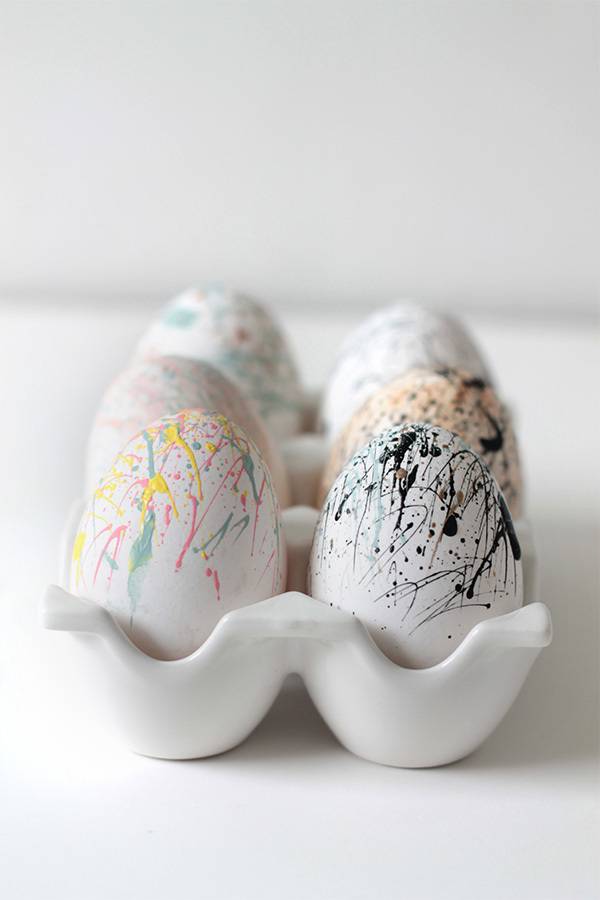
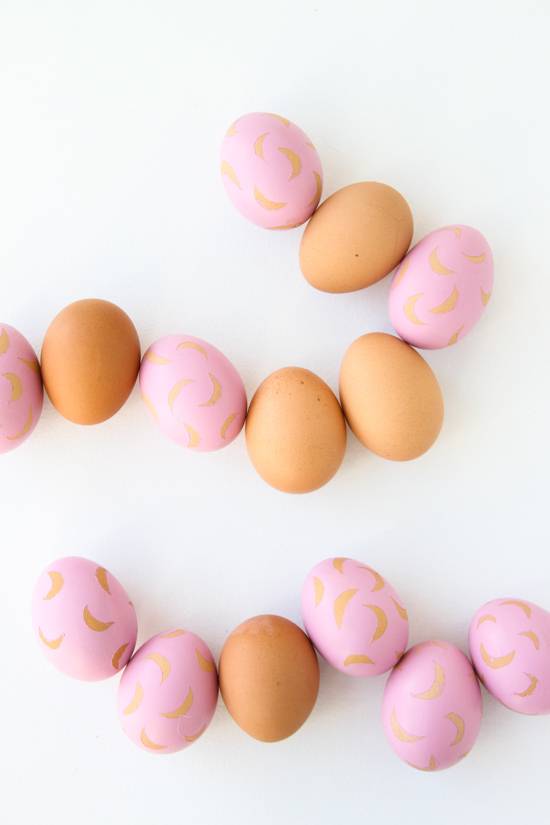
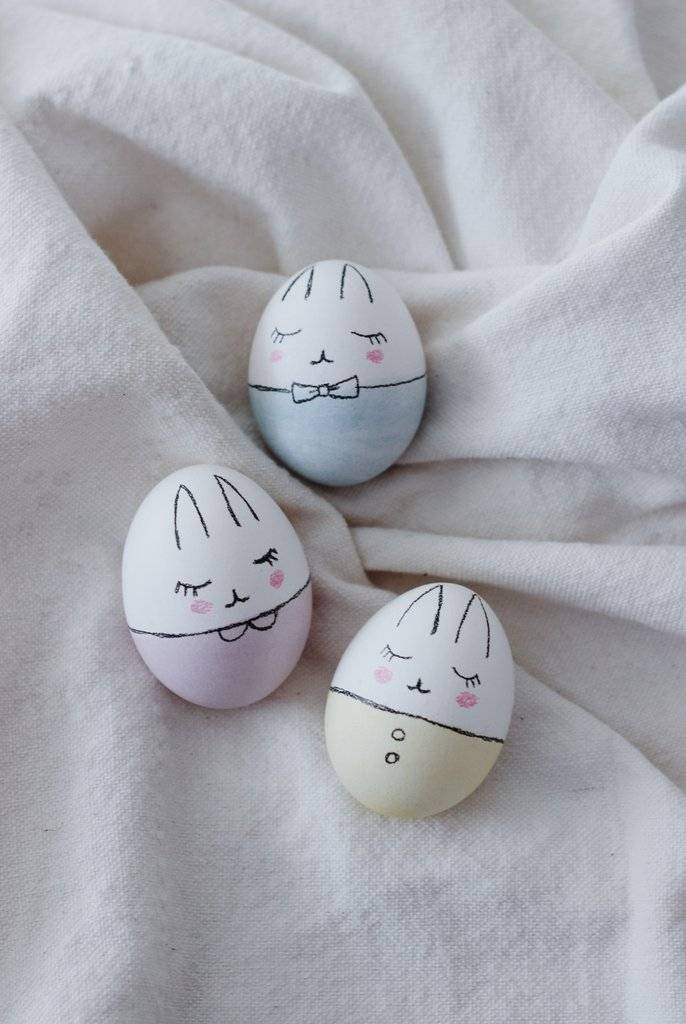
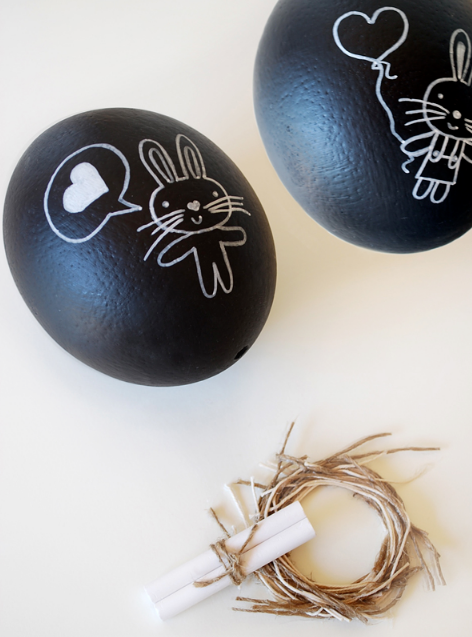
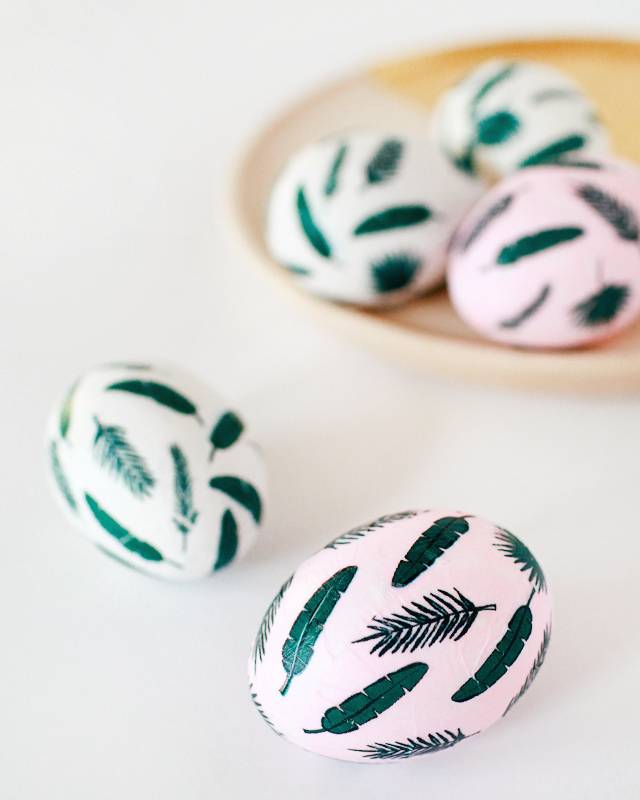
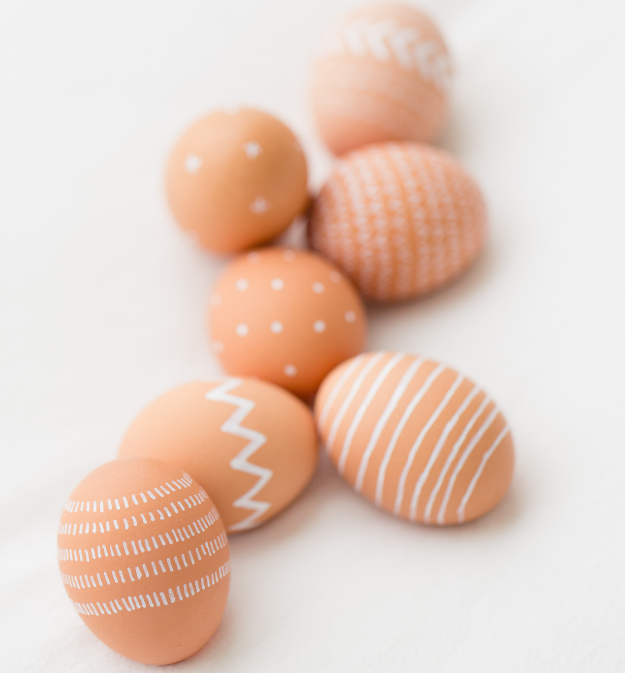
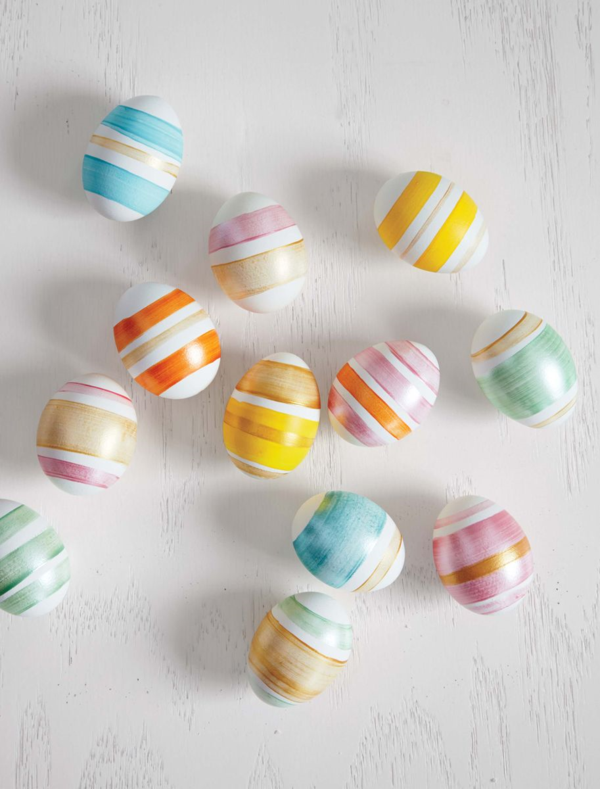
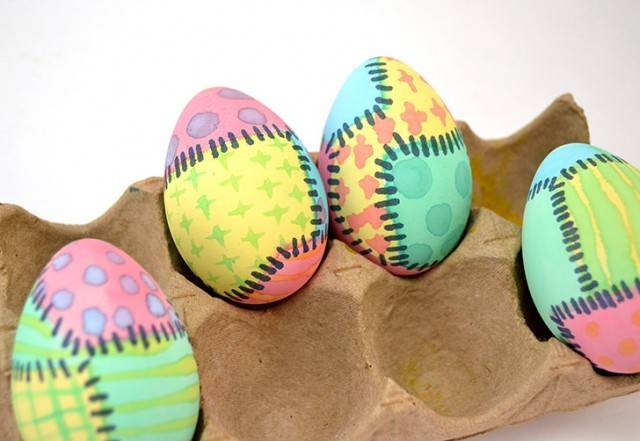
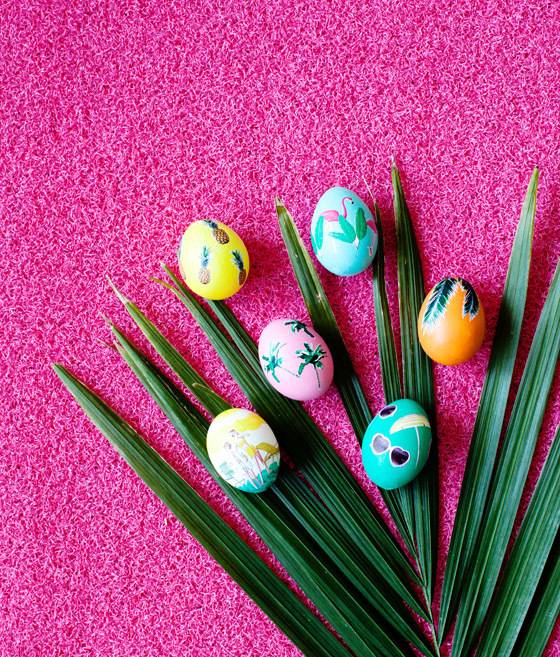
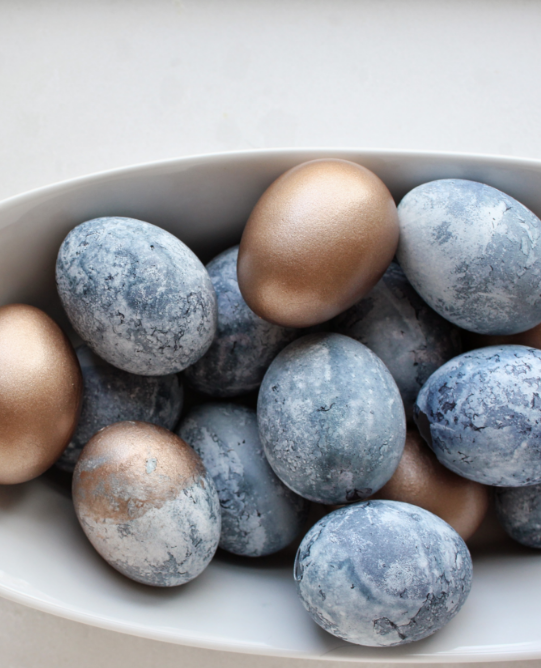
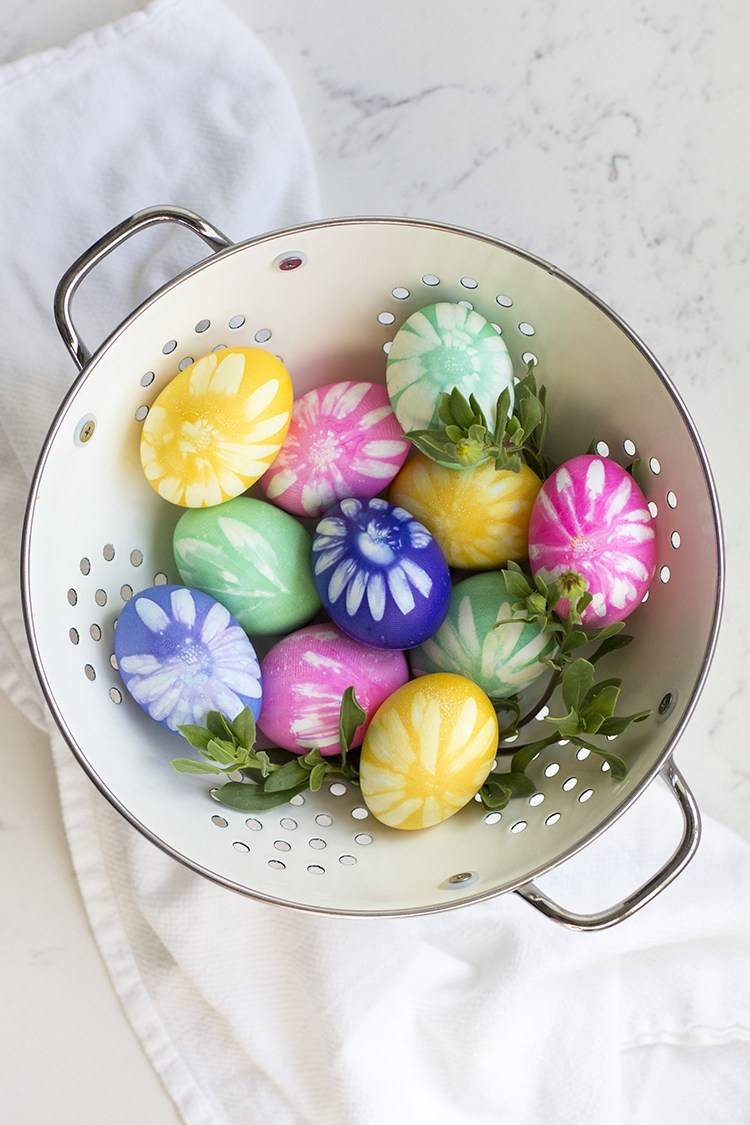
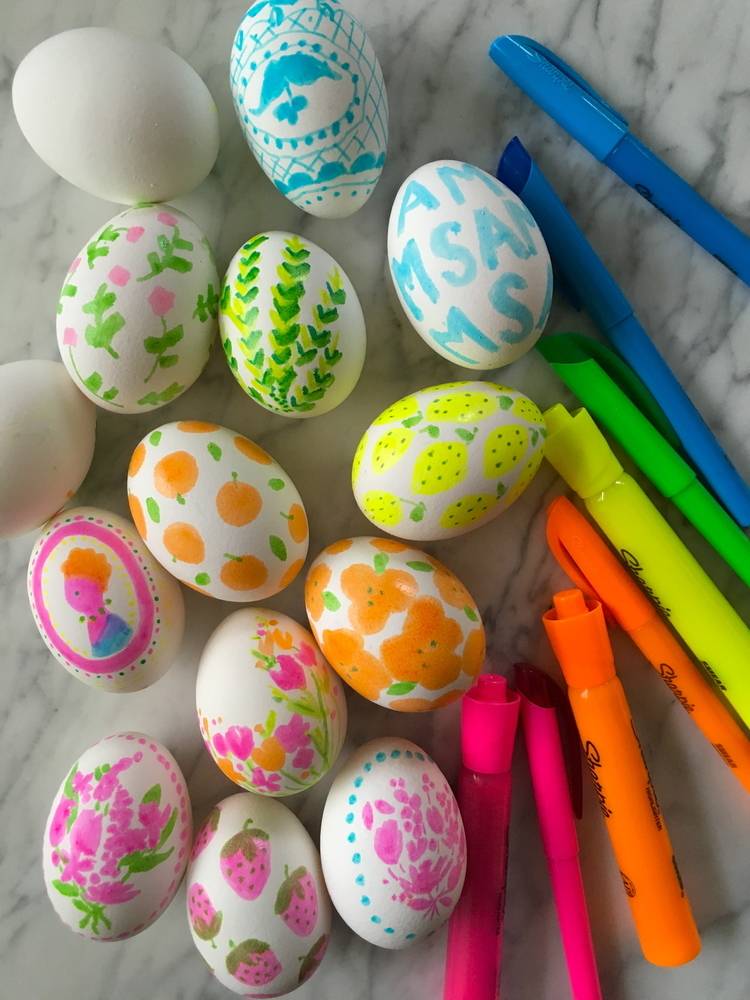
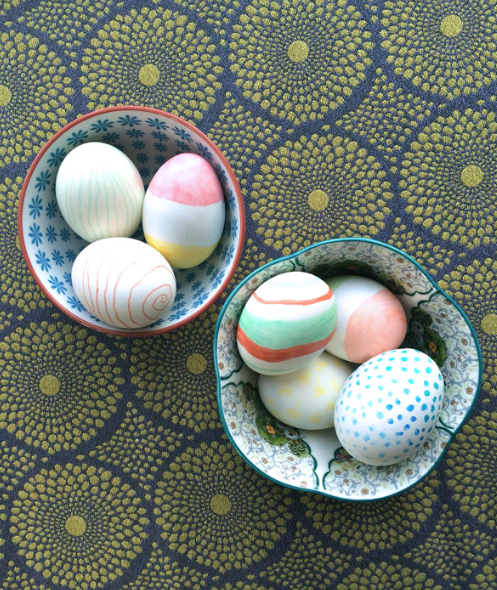
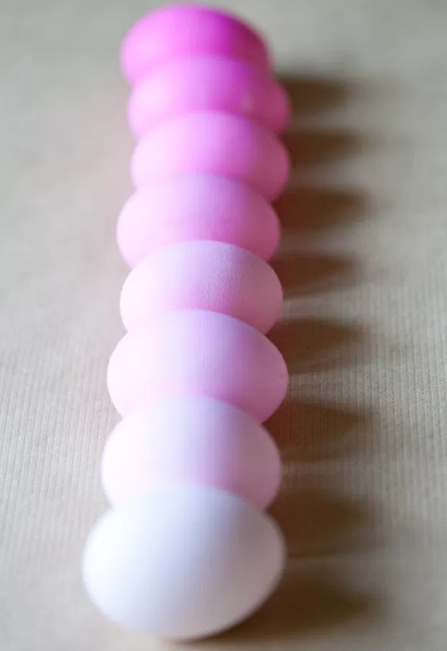
Spring has sprung and Easter egg season is here! Gone are the days of simply dropping tablets into water and vinegar and plastic-wrapping your eggs. Though there’s nothing wrong with the classic method, the sky is really the limit when it comes to egg decorating, and DIYing a dozen has never been easier or more beautiful. We’ve rounded up fifty of the best DIY egg-dyeing and decorating projects to inspire you!
We’ve rounded up one hundred IKEA hacks that prove you can have champagne tastes on a beer budget. Each of these hacks illustrates the power of transformation – basic warehouse pieces are cleverly altered in beautiful ways that make them feel custom. This round up has me feeling like Aladdin on a magic carpet ride – so come along with me! I can open your eyes, take you wonder by wonder, over, sideways and under on a magic IKEA hack ride. All hacks are listed in alphabetical order by their original IKEA birth name.
Note: we tried to find all of these and make sure they’re still available on IKEA.com. Some models have been discontinued, but you can usually find a similar item to substitute.
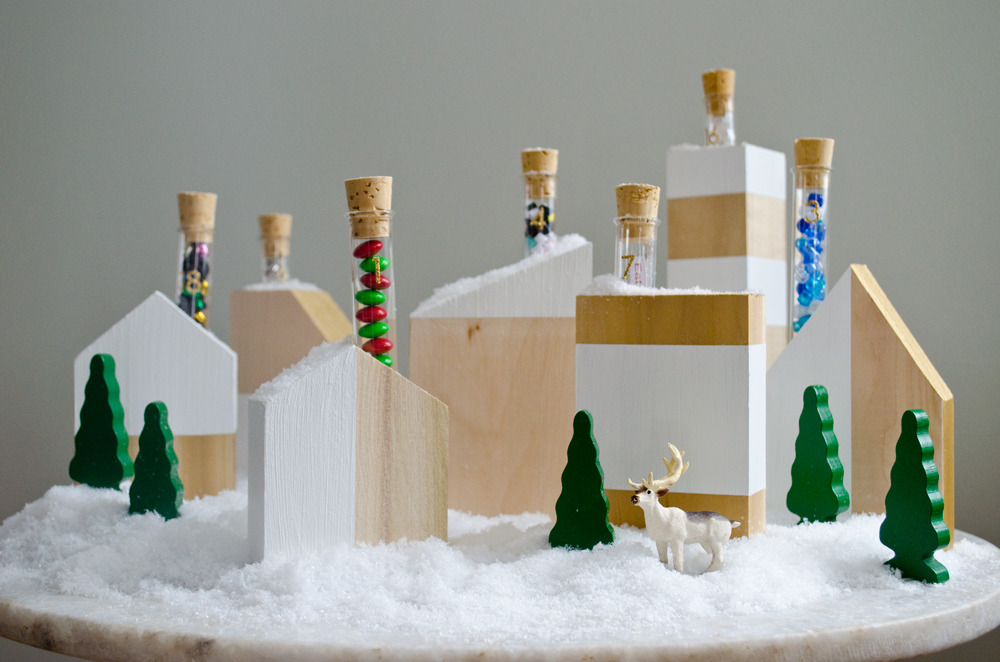
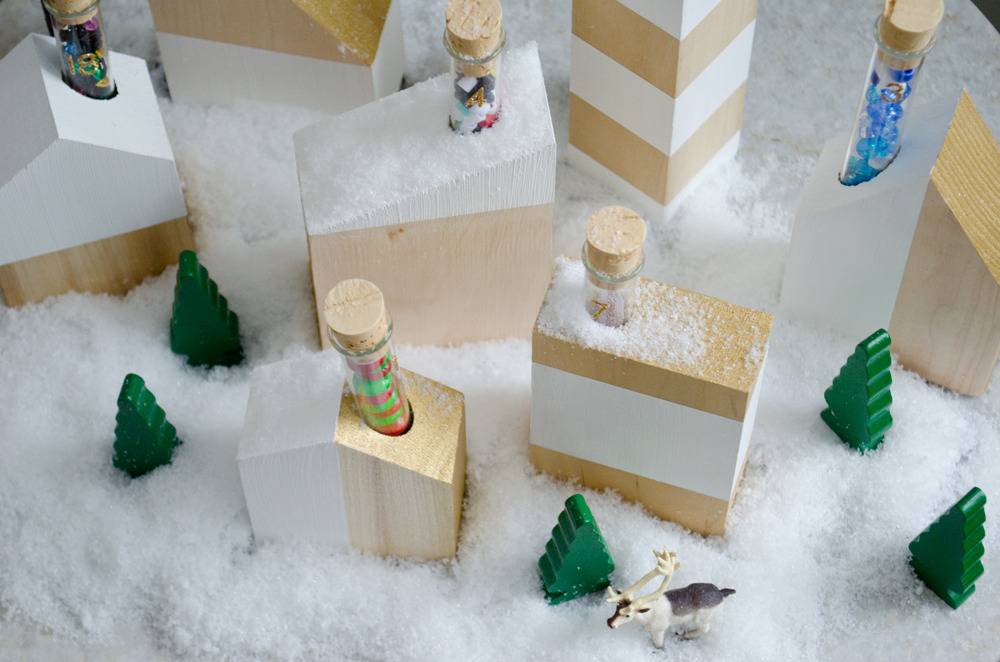
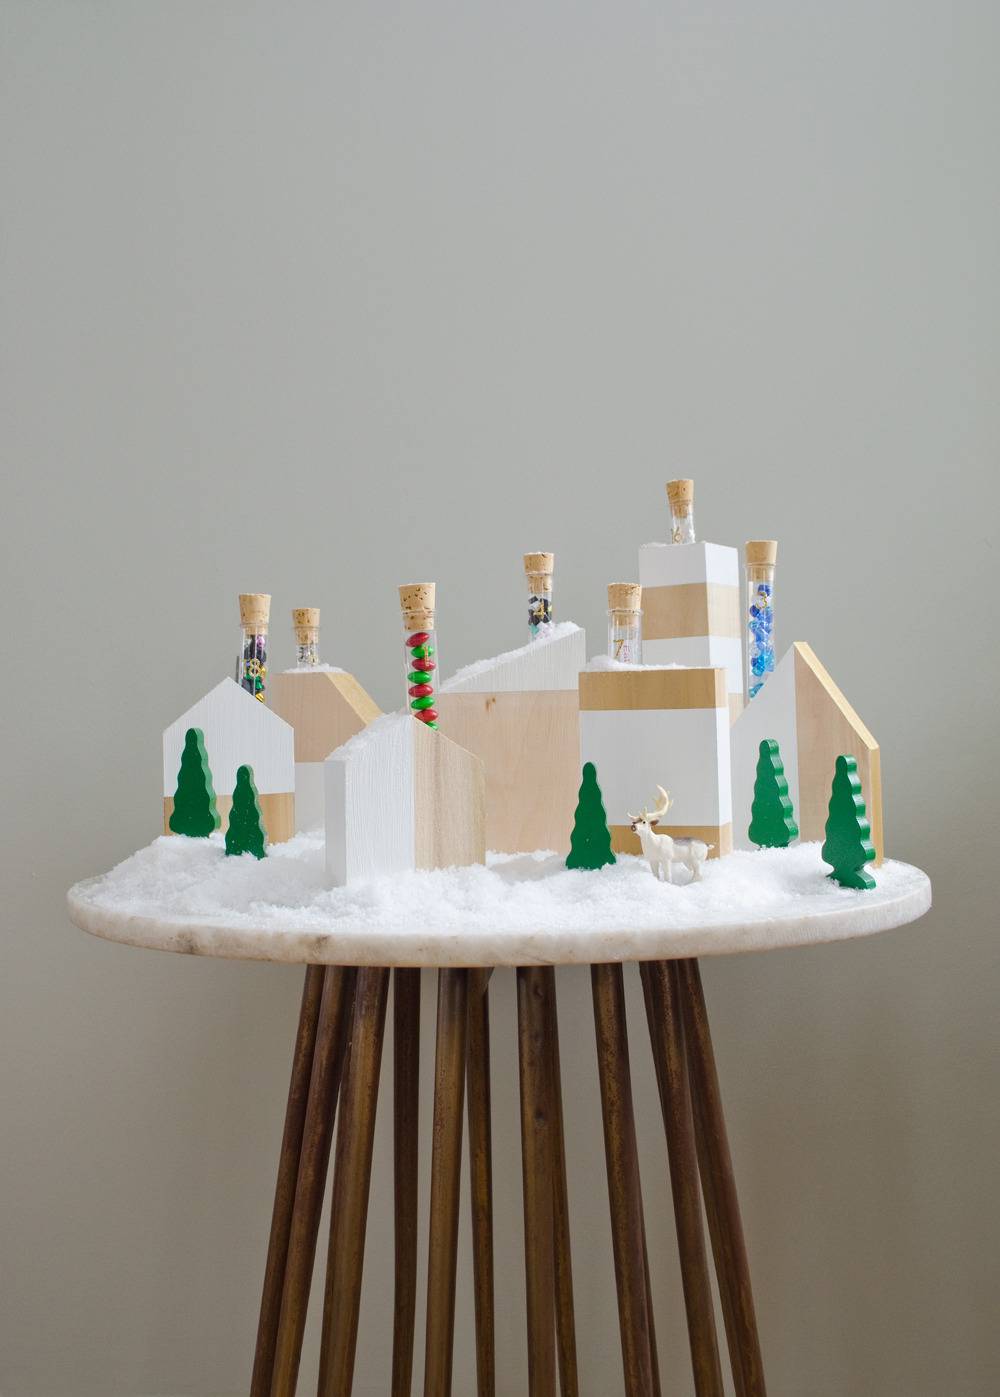
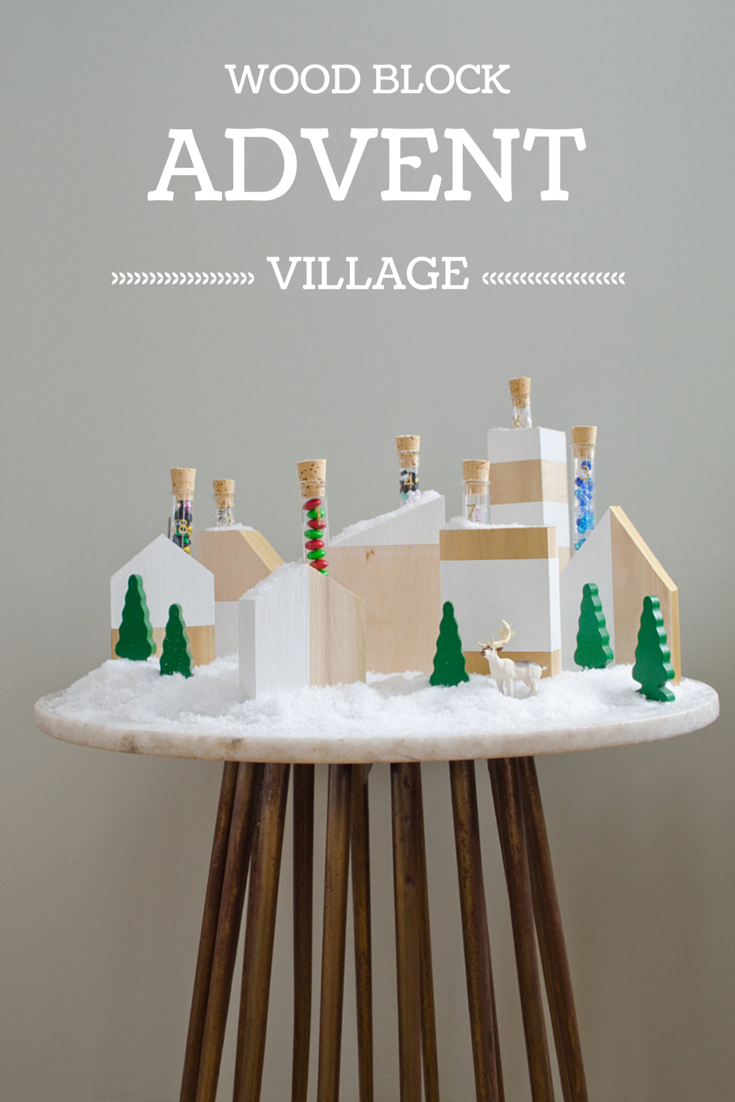
It’s advent calendar time! As I write this post, the Midwest is being walloped by a snow storm. Nothing inspires holiday decorating like many inches of snow, and to stave off decking all the halls, I created a little diy advent calendar village for our children. Read on for the full tutorial.
Using blocks of wood and test tubes, I assembled a village full of tiny treasures to help our family celebrate the season. The great thing about using test tubes is that it ensures each day’s surprise is small.
Creating your own diy advent calendar village is simple. We originally created 24 houses for this project, but the result was overwhelming, so we scaled back to a set of seven houses (to represent each week leading up to Christmas).
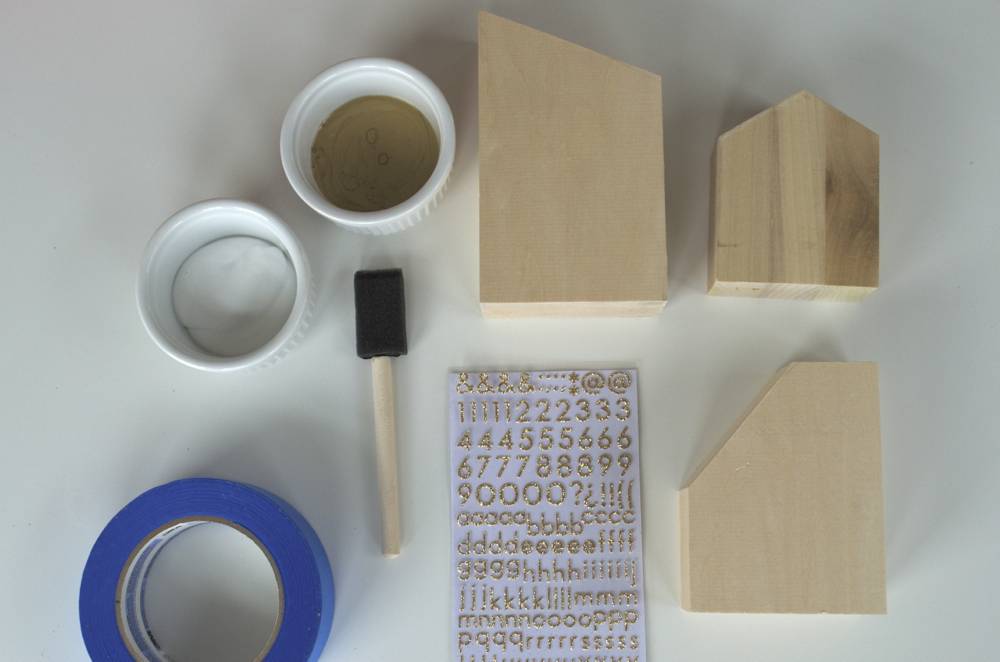
Cut your wood to size. Our houses ranged in size from 3.5″ to 6″ tall, and were about 2″ thick.
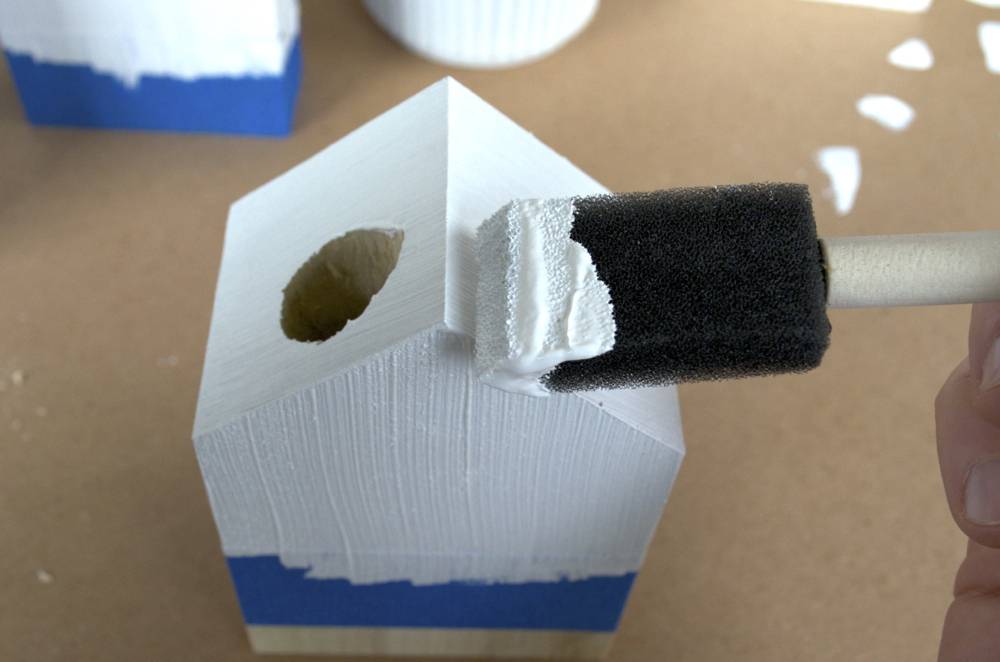
Drill your holes into the blocks of wood. We used a 3/4″ bit. It’s important to drill the holes before you create your angled roofs because it’s much easier to keep your holes plumb this way.
Cut angled roofs on your houses. I think it works best to create a variety of peaks, slants, angles. Because, you know, houses come in all shapes and sizes.
Lightly sand your houses.
Using painter’s tape, mark off the areas you’d like to paint on each house.
Paint your houses. We used white paint on the faces of the houses and gold paint on the rooftops.
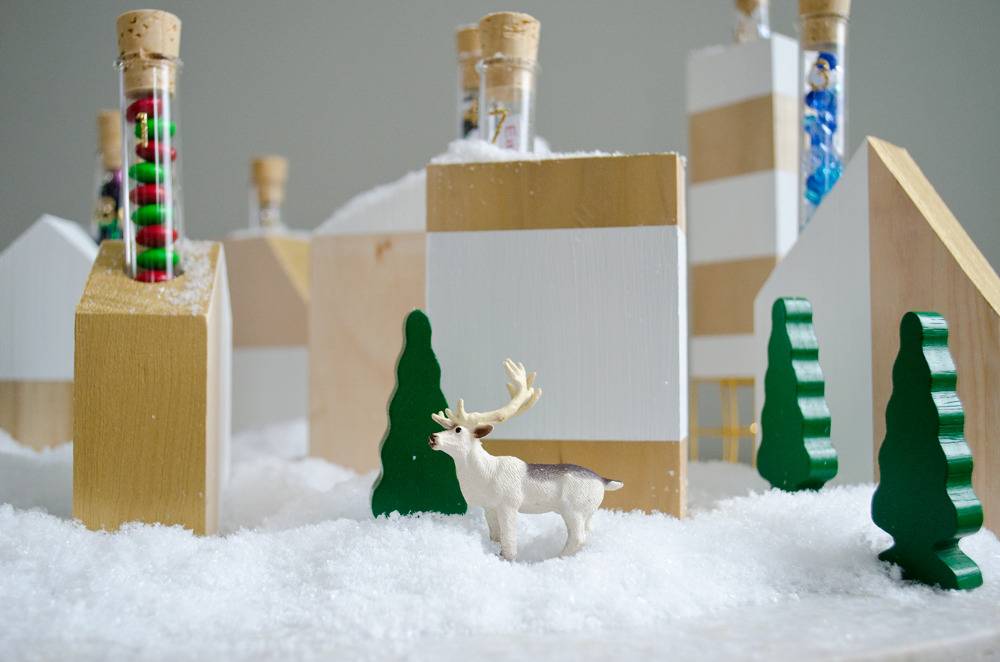
Fill your test tubes and place them in their homes!
I used a variety of small treats to fill my tubes, and I’ll share some of my favorites with you because it was a challenge to find goodies small enough to fit inside a standard test tube.
What to put in your DIY advent calendar?
Edible Treats: Candy like M&Ms work well. Hot cocoa with marshmallows is another winner.
Crafts: I filled many tubes with beads and ribbons that came in $1 craft store sets. Some of these sets were too big to fit the test tube, so I placed only a part of them in the test tube (e.g. mini colored pencils).
Notes: In a few tubes, I placed a note indicating a special thing we’d do together as a family (e.g. “Bake cookies.”, “Wrap presents.”, “Take an evening drive to look at holiday lights.”). Notes are also a great way to incorporate a service component into your calendar (e.g. “Shop for gifts for children and donate them to Toys for Tots”). I filled the tubes containing notes with confetti to make them more festive.
The final result is a sweet village to help us count down the days until Christmas.
If you like this how-to, do us a favor and share it on Pinterest:
Thanks for helping us share this project on Pinterest!


 I often say our porch is my favorite room in the house. It was horrendous when we moved in;